Pull out your Artbooking booklet and turn to page 58 and 59 to follow along with today's video. All images will be cut from there!
The "You + Me" layout is mostly talked about.
For later reference, if you want to recreate this page, here are the Real Dial Sizes Carly mentions:
Frame around the kissing couple: 4"
My Valentine cluster: 1.5"
People in cluster: 2.5"
Heart behind people: 2.5"
Carly didn't mention the size "you + me" was cut, but from looking at it, I would guess around 4"
The second layout features an umbra look using inks that are behind those white hearts. The technique:
Take a pigment ink pad (these are about 1" square pads -- for better control) and lightly swipe it back and forth from the center of your desired area of ink. As you reach the end, pull up on the ink pad. You can adjust the intensity of the ink color by the amount of pressure you use while swiping.
Carly mentions that several ink pads were used, but you could just use one color to highlight an area.
If you have any questions, please ask!
Friday, January 31, 2014
Wednesday, January 29, 2014
Studio J Layout Turned T-Shirt
I haven't showed you many layouts lately. Don't worry, I've been hoarding them!
Today I'd like to show you what I did for my husband's and my 20 year anniversary last year. We wend to Walt Disney World to celebrate and I wanted to commemorate the wedding. For the two layouts I made, I thought of them as four individual layouts instead of two 2-page layouts. However, I wanted to keep the same paper pack colors true so the four of us would be unified (see the bottom picture for what I mean).
For each of the girls, I took her birth picture, a current picture, and a picture of the four of us. Of course I journaled when they joined the family!

For the two adult layouts, I mentioned our twenty years. On each layout, I included the girls together, the four of us, the two of us, and a wedding picture. For Mike, I added a picture of the his three girls as well as me alone. For mine, you guessed it, I have a picture of him alone and with the girls.
 Once I was happy with the four layouts I checked out. Okay, I ended up buying the print version of these, but I didn't NEED to. If I didn't want them as layouts, I could have bought just the j-peg version (which comes as a large version and a web version). Since I bought the layouts, I got the j-pegs as well.
Armed with the j-pegs, I went to my printer with iron-on t-shirt transfer paper. I printed (don't forget to follow the package directions!) each page onto the transfer paper and then ironed them onto shirts!

So think about using Studio J for a family reunion. Isn't it better having pictures along with "Simone Reunion"? You could add pictures of past reunions.
Or what about a birthday shirt? You could add past pictures for that too. Or signatures.
There is no limit to the possibilities!!
Today I'd like to show you what I did for my husband's and my 20 year anniversary last year. We wend to Walt Disney World to celebrate and I wanted to commemorate the wedding. For the two layouts I made, I thought of them as four individual layouts instead of two 2-page layouts. However, I wanted to keep the same paper pack colors true so the four of us would be unified (see the bottom picture for what I mean).
For each of the girls, I took her birth picture, a current picture, and a picture of the four of us. Of course I journaled when they joined the family!

For the two adult layouts, I mentioned our twenty years. On each layout, I included the girls together, the four of us, the two of us, and a wedding picture. For Mike, I added a picture of the his three girls as well as me alone. For mine, you guessed it, I have a picture of him alone and with the girls.

Armed with the j-pegs, I went to my printer with iron-on t-shirt transfer paper. I printed (don't forget to follow the package directions!) each page onto the transfer paper and then ironed them onto shirts!

So think about using Studio J for a family reunion. Isn't it better having pictures along with "Simone Reunion"? You could add pictures of past reunions.
Or what about a birthday shirt? You could add past pictures for that too. Or signatures.
There is no limit to the possibilities!!
Sunday, January 26, 2014
Create Your Own
I made this card in 2008. Why am I showing it you now?!
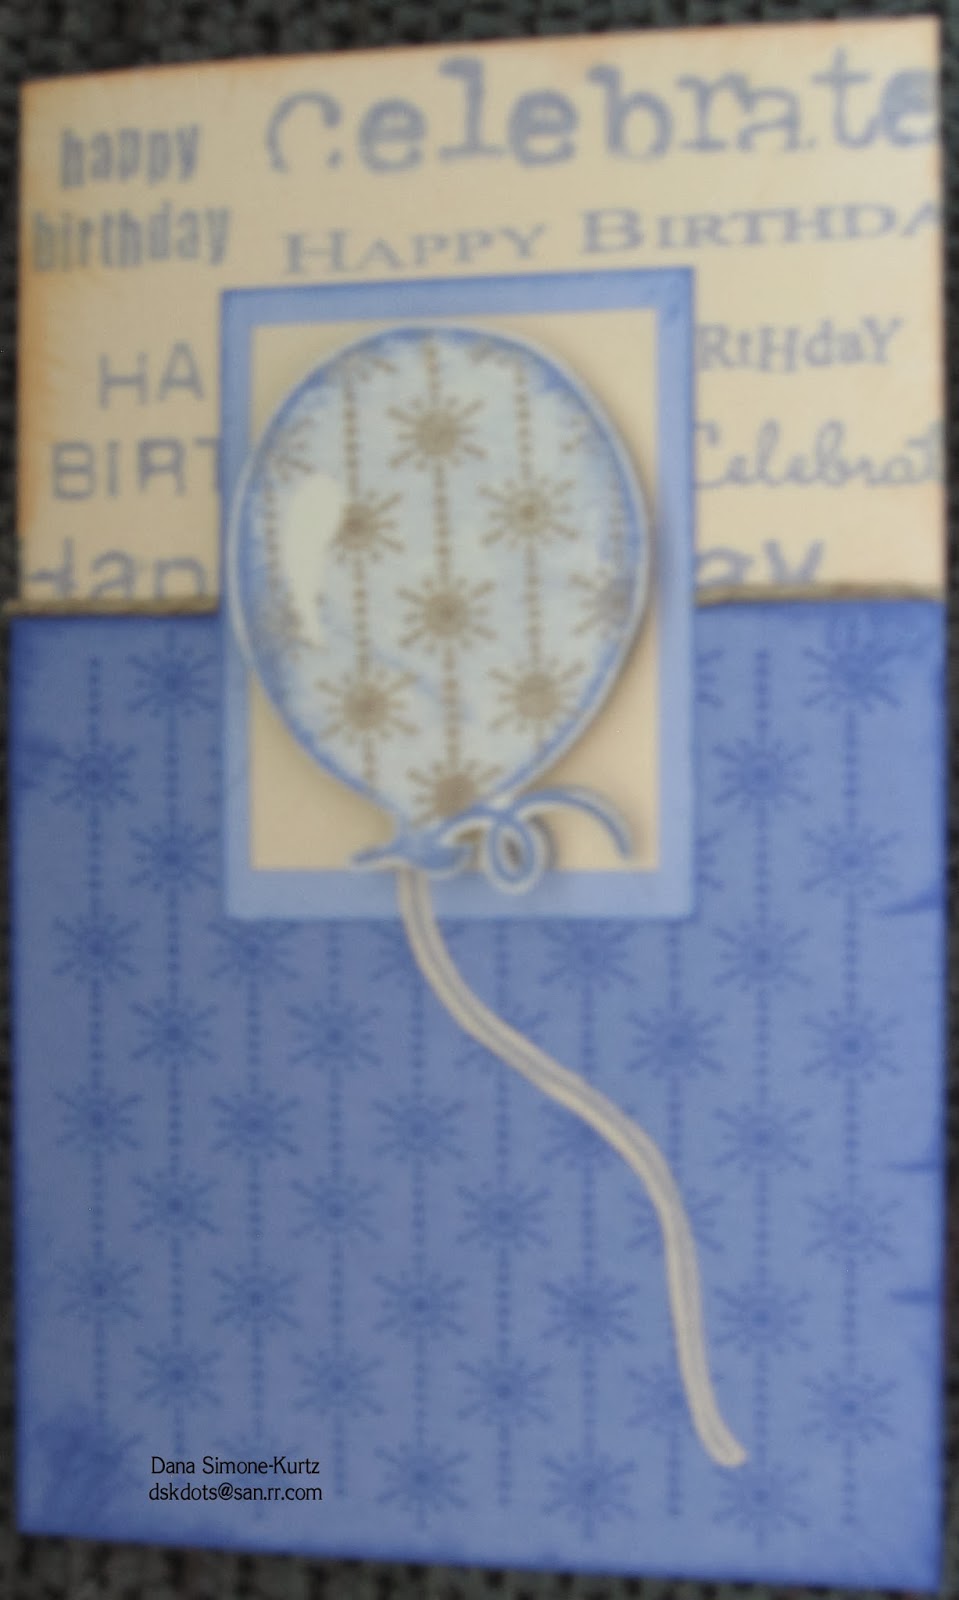 |
| Originals: Center Accent - 4.75"x3" |
The first technique is creating the top part. I took the different birthday wishes and placed them all on one block. I wanted to have "celebrate" and "happy birthday show" so I placed them on the block accordingly. I stamped in Spring Iris on the top of the card. Done.
Second technique is creating the background bottom portion of the card. I wanted the card to be monochromatic and there wasn't any background and texture paper suitable. That's why I stamped the bursts! If memory serves me, that was one stamp for the whole bottom. If not, then I stamped it multiple times. Bottom done.
Third technique is a fun one. The balloon kissed the background stamp! First, I inked my background burst stamp in Desert Sand and set it aside briefly. Next, I took the balloon and created a second generation (ink stamp and stamp once on scratch paper). Then, I kissed my second generation ready balloon to the background image. That's to say, I stamped the background onto the balloon. And finally, I stamped the balloon onto paper. Therefore, my image was a balloon with a background on it. Pretty cool, huh?! Finally I stamped the balloon string in Desert Sand, cut out the balloon and the string, and edge distressed the card and the balloon. The edge distressing technique was direct to paper. I took the ink pad and swiped the paper's edge along the edge of the pad. I sponged the balloon.
I assembled the card and mounted the balloon as the focal, and done!!
Can you use these techniques with the stamps you have currently? You bet! Will you look at future stamp sets and paper with these in mind? I sure hope so. : )
Thursday, January 23, 2014
Coming Soon: The Last Day to Order from the Autumn/Winter 2013 Idea Book
January 31, 2014 is the last day to order from the Autumn/Winter 2013 Idea Book! Please note that there is no grace period for retiring items, so be sure to complete your orders by 11:59 pm (MST) on Friday, January 31!
Any item (we're mostly talking accessories here) NOT found in the new Spring/Summer 2014 Idea Book will not be orderable after midnight, with the exception of some stamp sets. Also, items are on a while supplies last basis! One friend was out of luck when she tried to order Chantilly paper -- it's all gone.
Stamp sets continue to be available for one additional Idea Book, meaning that you may order stamp sets featured in the current or previous Idea Book. This means that through January you can order stamp sets from the Spring/Summer 2013 and Autumn/Winter 2013 Idea Books, but come February 1 you will be able to order only those featured in the Autumn/Winter 2013 and Spring/Summer 2014 Idea Books.
Also, all stamp sets that coordinate with one of our Cricut® collections will still be available. GO RIGHT NOW to view and purchase items that are set to retire on my website and select the “Retiring Items” category.
While you're there, don't forget about the Cloud Nine Cardmaking Kit celebrating Papercrafting month. Purchase the needed materials through me, and then join me February 24th or 25th to put your kit together (or I'll send you the cutting diagram and pictures of the additional cards we'll make).
Friday, January 10, 2014
Happy 2014! I'm on Cloud Nine
I hope everyone had a delightful holidays 2013. Yes, that includes Thanksgiving. It has been some time since I've last posted. I had some great family time and "away from it" time. Now I'm raring to go!
This month is National Papercrafting Month and Close to my Heart is celebrating with Cloud Nine cardmaking kit.
You can get an exclusive Cloud Nine cardmaking kit for $15 (retail value $46) with a qualifying purchase of $35 or more (excluding tax and shipping) during January in celebration of National Papercrafting Month. Make 10 adorable cards (2 each of 5 designs) with funky messages to put any recipient on cloud nine! You can add one cardmaking kit for every $35 in your order*.
Watch the campaign video and then contact me for more details (if necessary).
*Note that Cloud Nine cardmaking kits do not count toward qualifying order totals. The retail value of the order is totaled prior to determining promotional kit eligibility (while supplies last items are not eligible). For example, if you purchase $60 in retail items, and add a single card kit for $15, that $75 purchase does NOT qualify you to add a second promotional kit. The qualifying base purchase is exclusive of promotional cardmaking kits.

If you purchase the kit by January 20th, as a bonus, I'll send you sponge daubers! Just go to my website and join the Cloud Nine Workshop gathering. I'll know you ordered the kit by the 20th, and will send you 3 sponge daubers, on me. : )
While shopping look through the retiring items category. Those items are going away January 31, 2014.
If you are local, join me on Monday February 24th or Tuesday February 25th to cut and assembly your kit. In addition, you'll make four more cards with leftover paper. Can't make it or don't live in San Diego? Not to worry, because I'll email you the cutting diagram and pictures of the completed cards.
Missing the January 20th deadline is not a big deal. I'll still send you the cutting diagram and pictures of the extra card. But don't wait too long... the promotion is only available until January 31, 2014 (or while supplies last).
 So, as you look at these pictures, and the promotion, look beyond the paper. It's the stamp set that's the real winner here. As you can see in the next picture, I used the cutting guide from the cardmaking kit with Lola paper (made a few more cuts to compensate for the washi tape) and have more cards! Therefore the possibilities are endless!
What will you need to complete Cloud Nine cardmaking kit?
Lagoon ink (Z2195)
Sunset ink (Z2191)
2”x6½” block (Y1010)
3”x3” block (Y1006)
3D foam tape (Z1151)
adhesive
scissors
paper cutter
For one of the extra cards, I used Honey ink (Z2162), but you could use Sunset ink instead
Sponge daubers (Z726) for the extra cards
This month is National Papercrafting Month and Close to my Heart is celebrating with Cloud Nine cardmaking kit.
You can get an exclusive Cloud Nine cardmaking kit for $15 (retail value $46) with a qualifying purchase of $35 or more (excluding tax and shipping) during January in celebration of National Papercrafting Month. Make 10 adorable cards (2 each of 5 designs) with funky messages to put any recipient on cloud nine! You can add one cardmaking kit for every $35 in your order*.
Watch the campaign video and then contact me for more details (if necessary).
*Note that Cloud Nine cardmaking kits do not count toward qualifying order totals. The retail value of the order is totaled prior to determining promotional kit eligibility (while supplies last items are not eligible). For example, if you purchase $60 in retail items, and add a single card kit for $15, that $75 purchase does NOT qualify you to add a second promotional kit. The qualifying base purchase is exclusive of promotional cardmaking kits.

If you purchase the kit by January 20th, as a bonus, I'll send you sponge daubers! Just go to my website and join the Cloud Nine Workshop gathering. I'll know you ordered the kit by the 20th, and will send you 3 sponge daubers, on me. : )
While shopping look through the retiring items category. Those items are going away January 31, 2014.

If you are local, join me on Monday February 24th or Tuesday February 25th to cut and assembly your kit. In addition, you'll make four more cards with leftover paper. Can't make it or don't live in San Diego? Not to worry, because I'll email you the cutting diagram and pictures of the completed cards.
Missing the January 20th deadline is not a big deal. I'll still send you the cutting diagram and pictures of the extra card. But don't wait too long... the promotion is only available until January 31, 2014 (or while supplies last).
 So, as you look at these pictures, and the promotion, look beyond the paper. It's the stamp set that's the real winner here. As you can see in the next picture, I used the cutting guide from the cardmaking kit with Lola paper (made a few more cuts to compensate for the washi tape) and have more cards! Therefore the possibilities are endless!
What will you need to complete Cloud Nine cardmaking kit?
Lagoon ink (Z2195)
Sunset ink (Z2191)
2”x6½” block (Y1010)
3”x3” block (Y1006)
3D foam tape (Z1151)
adhesive
scissors
paper cutter
For one of the extra cards, I used Honey ink (Z2162), but you could use Sunset ink instead
Sponge daubers (Z726) for the extra cards
Subscribe to:
Posts (Atom)