Monday, March 31, 2014

Jubilee Archived Thank You

I loved this stamp set long ago when it was a rubber mounted stamp. I was excited to see Jeanette brought back some goodies in acrylics!

I paired the Flowering Thanks stamp set (Z1145) with Jubilee paper (X7181B) and Make it From the Heart Volume #2 together for this card.  Of course I think it turned out nicely!

Pattern #23 was followed for this card.  I colored in the Black inked (Z2105) stamp with our Watercolor Pencils (3505) for a nice soft look.  The upper right corner is adorned with Red Shimmer Tape (Z1848) cut at an angle, and I added Bitty Sparkles (Z1263) to the focal.  I didn't even need to think where to put them - I just followed the small circles Jeanette added when she drew this stamp.  :).  I finished the card by mounting the focal for some dimension and adding a brown sparkle to the potted flower's center.

Sometimes you'll see your sparkles coming off.  If that happens, just add a drop of liquid glass to the spot where the sparkle (or any accessory) is going.  Your sparkles won't be going anywhere after it dries!


Saturday, March 29, 2014

Happy Birthday Lollydoodle

If you're looking for a fun birthday card, look no further!  Lollydoodle is a bright, but not overwhelming, paper.  I think the colored circles make this paper look, dare I say, whimsical.

This card was super simple to make.  The owl, branch, and leaves from the Owls stamp set (B1450) was colored in with our Watercolor Pencils (3505) and cut out.  When stamping, I attached the leaves to the branch so I wouldn't have to cut those out separately.  I colored the owl's chest with the same colors as the background.  I randomly colored the feathers.

"Happy Birthday" (from Holiday Tags set D1560) was stamped in Chocolate ink (Z2111) - as was the owl and branch.  The leaves were stamped with Pear ink (Z2197).

I followed pattern #20 from Make it From Your Heart Volume #1 with the exception of the addition of the Silver Shimmer Tape (Z1799) in the upper left corner.  Those strips added just the right touch for me.

What else to say about the card?  The owl is mounted.  Enough.  : )

Wednesday, March 26, 2014

Timberline "Hello" Card

Today I thought I'd show you my masculine hello card.  This fun card is from Make it From Your Heart Volume #1 and is pattern #24.
If you  look at the pattern in the book, you might not recognize it.  I turned the pattern upside down!    The "hello" shape and stamp are from the Artiste Cricut Collection, as is the downward arrow.

All but the arrow and the base have been edge distressed with the edge distresser.  At first all I added was the "dot" after the salutation, but then I auditioned the triangular durables.  As you can see, they got the job!

Twilight and Bamboo ink were the two colors I stamped on the Colonial White cardstock.  And that's Creme Brulee behind the focal "hello".   Finally, the hello and the arrow are foam mounted to give the card some dimension.

Tuesday, March 18, 2014

Balloon Ride and Adrianna Cards

Want to know my favorite part of this card?  All of it!!  It doesn't always happen for me, but the cards I made while in Incline Village, Tahoe this February are some of my favorite cards I've made in a long time.  Sometimes I'm not able to create what I have in my head. 

But not this time!  The card looks better than it did in my head.  Let me tell you what went into making it.
First of all the colors are very soothing.  Balloon Ride features Cashmere, Colonial White, Creme Brulee, Crystal Blue, Juniper, Saddle, Sky, and Sorbet. This card uses just Creme Brulee and Saddle Ink.  The focal banner is from Banner Wishes (B1438) stamped in the two colors I just mentioned.  This Thank You card was created by following pattern #28 from Make it From the Heart Volume 2.

Other features of the card?  I sponged all the background and texture pieces with Saddle ink and added the durable stud triangles (obvious, Dana).  My favorite part of this card is that I mounted the bottom background and texture pieces with 3D foam so the whole card is elevated from the card base (Colonial White)!  And on top of that (literally), I mounted the saying!  Like I said, "LOVE it!"


This second card is not quite as high on my favorite list, but it, too, turned out like I visioned.
Balloon Ride and Adrianna paper packs were used here. This card is from Make it From the Heart Volume #1 and is pattern #28 (I modified the pattern accidentally).  The striped paper, according to the pattern, was supposed be adjacent to the Balloon Ride B&T center paper.  I liked the look (and couldn't get the paper up!) so it stayed this way.  : )  The stamp sets are Balloons (M1037) and Holiday Tags (D1560).

I'm going to interject here and tell you that it's been requested to include this card in the Spring Fling workshop scheduled on April 26th from 12:30 - 5pm.  Now you know one project!

Anyway, I colored the balloons in with colored pencils.  I stamped the balloons a few times before doing so.  Once for the base in Desert Sand (the string), once in Sky (blue balloon), and once in Sorbet (other balloon).  After I colored the balloons in, I cut them out and matched the colored balloons to the base balloons.  Just the balloons were mounted.  I glued the end of the strings down to the cardstock to give the balloons that much more dimension.  Finally, I mounted the "Happy Father's Day" piece as well.

The thing I like about this card is the versatility it brings.  Without even changing the paper, I can use a different saying from the Holiday Tags stamp set.  And, of course, by changing the paper and colors, I can make the card look different still.  The Brown Sparkles are the last touch to this card.


Sunday, March 16, 2014

Washi Tape Technique and New Awesome Cardstock

Carly talks about using washi tape to enhance your paper crafting projects.  She also shows you an easy technique to have the tape stand out more.


The other thing Carly shows you, albeit briefly, is our new Paper Fundamentals Basics Assortment (Z1939).  The background to the layout shown is found on page 126 of the Spring/Summer 2014 Idea Book. There are 2 sheets of 10 designs in the basic colors - black, grey, and browns - same design on both sides, one side with glossy resist pattern (as shown on layout).

I have to tell you that when I saw the price of $19.95 for 20 sheets of cardstock, I flinched!  I thought there was no way paper could be so expensive.  Well, that was before I visited Michael's and saw not only their selection, quality, and price that I changed my thought to "Wow!  CTMH is a bargain!"  The paper is two sided, acid and lignin free, and buffered.  It is also heavy cardstock.  I shouldn't have doubted Close to my Heart (silly me).  Now I have to get me some of that paper!

Thursday, March 13, 2014

April 2014 is Double the Worskhop Pleasure

With a large school event coming up, I have not had the opportunity to get a workshop for March advertised so we are going to have two workshops in April.

The first workshop we will be putting together a Hip Pics album.  The album holds 16 4"x6" photos.  You'll get a choice of workshop price, depending on what you want in the workshop.  Workshop dates are Monday April 7th or Tuesday April 8th.  I need to know if you are coming, which option you'd like and/or if you want a kit by March 25th (if I'm mailing a kit, add shipping of $5 to the cost of the workshop).

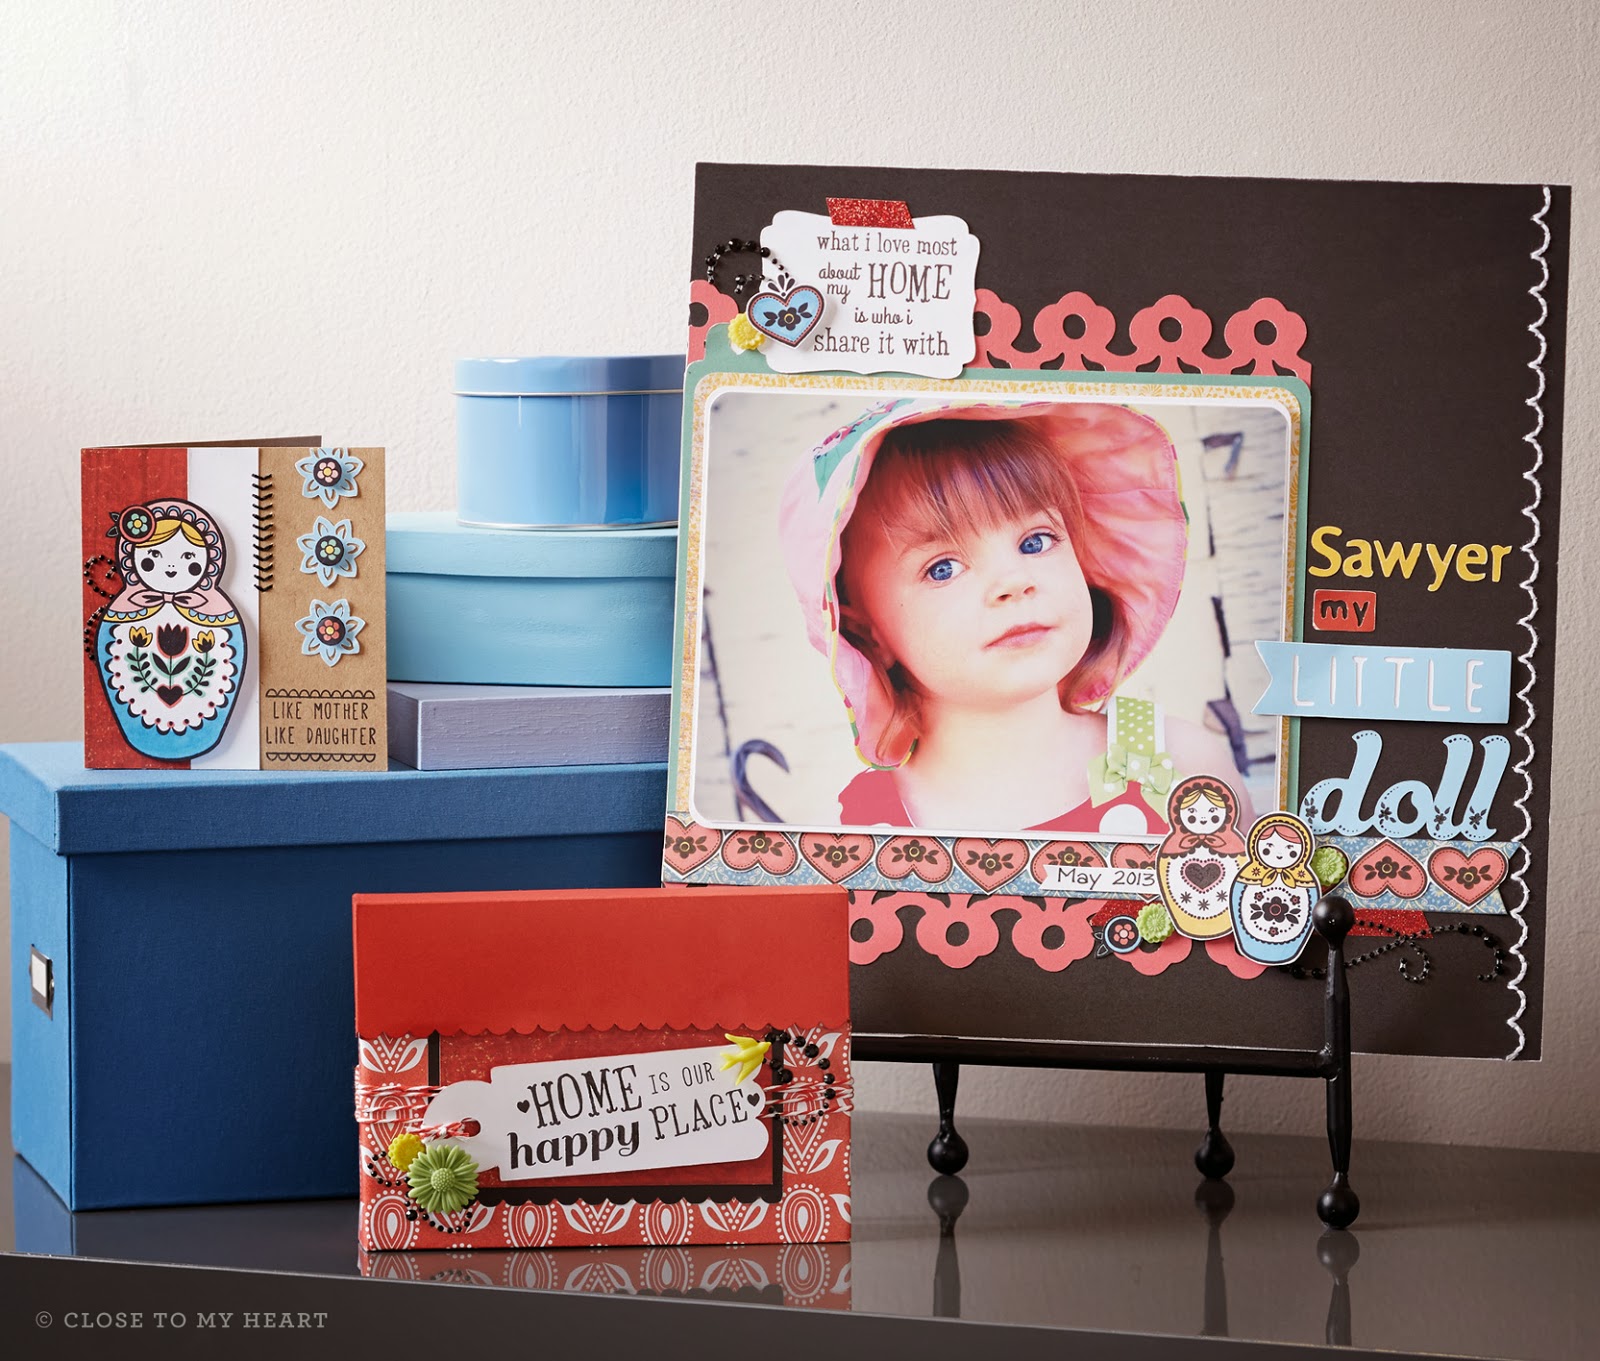
Here are pictures from a few pages of the project:
 Option "I Want Everything!" includes the two stamp sets used:  Flight of the Arrows (D1578), Love This (B1432), Hip Pics Album (Z1956), Durable Studs (Z1928), Flamingo Dots(Z1934), Dreamer Style Sheet (Z1976), Washi Tape (Z1932), Base & Bling Dreamer (Z1955), and Faux Antiqued Silver Chain (Z1940). 

This option is $75 and you will also receive bonus items to make a necklace (not shown) that includes Rhinestone Charms, a Glass cover, and Silver Circle Pendent.

You should be able to go home and repeat the workshop with your remaining supplies (you won't be able to duplicate it exactly with your leftovers, but pretty close).
Option "On my Own" includes Hip Pics Album (Z1956), Durable Studs (Z1928), Flamingo Dots(Z1934), Dreamer Style Sheet (Z1976), Washi Tape (Z1932), Base & Bling Dreamer (Z1955).  It doesn't include the necklace or the "bonus" items. 

You'll make the book and have some leftovers, but you won't have the stamp sets.  This option will run you $35.
If you want to make the necklace as well as the album without owning the stamp sets, you'll want to go with option "On my Own Plus". This Plus option is the "On my Own" option plus the chain and  the bonus items Rhinestone Charms, a Glass cover, and Silver Circle Pendent to make a necklace (not shown).

On my Own Plus will cost you $45.

Finally, if you want to "Just Get By", then this last workshop option is right for you.  You will receive just enough materials to make the album (and your charm - as seen on the front cover - may not match exactly).  The exception to this is the Dreamer Style Sheet (Z1976), you'll receive your own. 

This final option is $25.

I think the workshop is fabulous whichever way you want purchase it.  If you really want to duplicate this workshop exactly at home, you will need some additional supplies (if you don't already have them, of course).  Flight of the Arrows (D1578), Love This (B1432), Hip Pics Album (Z1956), Lagoon Ink (Z2195), Cotton Candy Ink (Z2193), Blush Ink (Z2106), Gypsy Ink (Z2190), Archival Black Ink (44751), Journaling Pen (Z1979), more necklace materials, B&T papers from Skylark (X7177B), Timberline (X7182B), and Lollydoodle (X7183B), and Lagoon Cardstock(X5762).  Talk to me if you do want to replicate the workshop exactly.  I'll give you the B&T paper you'll need.


Whew, that was a lot of information!!  Sometimes I hate those necessarily evil things.


The second workshop will be our Spring Fling workshop.  That is set for Saturday April 26th from 12:30 - 5pm.  It will be like last year - pay for the projects you want to do, and come and go as you'd like.  There will be at least 10 different projects to choice from.  Don't miss it!  I'll have more information as we get a little closer.


Sunday, March 9, 2014

"Emergency Use Only" Gift Bag Topper


I had an event this past weekend and made these survival bags to pass around.  I wanted to make sure everyone would be okay.  : )

I made 25 bags in a short period of time.  One of my recipients asked if I stamped each of the letters at a time.  I told her, "No, no no.  I'll be blogging how I put this together."  : )

I'd like to think I work smarter than harder -- even if the results don't show that.  So let me show you how...


The bags I used are from Joann's.  They are the Wilton bags, but you could use any bag.  I determined what size would look good for the bag size.  In this case, finished 4.25" x 2" which means for each topper I needed a 4.25" x 4" piece of paper.  Since I have 12" x 12" paper, I calculated that I could fit 6 toppers on one sheet of 12" x 8.5" paper.   I cut my 12" x 12" White Daisy cardstock to those dimensions.

Next, I "randomly" stamped my whole paper.  "Random" is in quotes because as I stamped, I created triangles with the image.  And I started with the largest stamp image.  Once my Cotton Candy large circles (Oodles of Doodles) were stamped over the paper, I repeated the process with the medium circle with Pear ink.  If you can't tell, my colors were inspired by the Lollydoddle paper.  Finally, I completed the random stamping with a small circle (from Hooray Bouquet) in Twilight ink.

I'm going to inject here to say that I HAD to buy and use Oodles of Doodles stamp set just because of the name!!  I'm super excited that I like the set!  : )


So now that my paper is stamped, and to cut down on time, I scored the paper where it's going to fold before I cut it.  This way I only have to score 3 lines -- one at 2" (not shown), 6", and 10" (along the 12" side).  Now it's ready to cut.  I cut along the 8.5" side at 4.25", rotated the paper and cut at 4" and 8".  Done.  I now have 6 pieces ready to be layered upon.

 I scanned these smaller pieces and filled in some gaps with the colored circle stamps.  When I cut the paper, some of the white space turned out to be too large for the smaller paper.


 The next layer was the Whisper paper.  This measures 1.5" x 3.75".  Again, I calculated how many I could get from a 12" paper.  I cut strips of 3.75" width from 12" cardstock.  I'd get 8 finished pieces from one 1.5" x 3.75" strip.  I placed the strip in my Dot Embossing Folder (z1924) and ran it through my embossing machine once.  The folder is only 7" long, so I took it out and moved it up in the folder (there is a slit at the fold - how awesome is that!!), I lined up the circles, and ran the strip through once more.  So two passes for 8 pieces -- not shabby.  Before I cut the paper to proper size, I sanded it with our Sanding Kit (z1294).

Next layer is the banner.  I took Oodles of Doodles banner for that.  When I stamped with the scribble, it was too much scribbling for my taste.  But I liked the look the banner provided.  I enlarged the banner to 1.25" and cut those out of Twilight cardstock.  The image can be found on Artiste Cricut Cartridge on the Accent 3 Shift key (<Ac3><Shft> Column 8 Row 3).  Got the banners cutting and got ready for the next step -- the words.


A Typeset (A1117) was the font I went with.  To assure my words fit, I took a cut banner and laid the letters on the banner as they'd appear after stamping.  When I came to a letter that repeated, I moved the letter after the following letter was placed down.  In essence there was a hole left.  Once I was satisfied with the placement of the

 letters, I took my block and attached my saying to the block!  It was then easy to stamp the saying on all of my banners in Twilight ink.  When that was done, I went back and filled in the missing "e" and "y".  The beauty of clear stamps and blocks!!

Finally, I sponged the banner and mounted it with foam tape.  I glued everything together and I finished my topper!  How's that for working smarter, not harder.  : )

Friday, March 7, 2014

Leprechaun Hats


In San Diego cookie season is coming to a close.  Cookie booths are done on March 9th but individuals will still be able to sell until March 16th.  Why am I telling you this?  Because you just might want to get an extra pack of Thin Mints for this tasty St. Patrick's Day treat!

I found this recipe on Pintrest from thecakeblog.com under Leprechaun Hats.  The baker used Keebler Fudge Striped cookies for the brim.  However, since it's Girl Scout Cookie Season with two Girl Scouts in the house, I made my from Thin Mints!
Other major differences exist between my hats and thecakeblog hats.  I used chocolate chips to coat the marshmallows.  The cookies are already coated so I didn't need to do that.  Also, I piped the green hat band.  Oh, the main/major difference between the cookies... her's looks professionally done!!

When I do this again, I will use melts or Almond Bark (found at Walmart) instead of the chocolate chips.  The finish is much smoother.

The shamrocks weren't as easy to make as thecakeblog made it seem.  Of course it could have been because it was raining out.  The melts were liquid, but as soon as it hit the parchment paper on the granite counter-tops, they hardened.  I dropped the three dots of melt closer than their picture shows so I wouldn't need to blend them as much.  That helped a lot.

However homemade they look, they are YUMMY!  And I'm not a huge fan of Thin Mint (I know, blasphemy!!).  But the combination of Thin Mint cookie with marshmallow hit the spot.

So get your Thin Mint cookies before it's too late!  And Happy St. Patrick's Day!!


Wednesday, March 5, 2014

March 2014 Stamp of the Month

"Happy Place" (S1403) is too cute!  And what timing now that the Russian Olympics are over.  Everyone is in love with nesting dolls.  Don't miss out on them because they are only here until March 31, 2014.


With national pride at a high right now, the sayings within this stamp set is just as sought after as the images.  From these examples you see how versatile the set is.


Go ahead, make that purchase.  You know you want to.  Don't forget, your qualifying purchase of $50 (subtotal) gets the stamp set for just $5.  Like the set but have your sights on another one?  You can purchase this one for $17.95.  Either way, this stamp set is in your hands and you're happy.  Just remember to order it before midnight (central time) on March 31, 2014!

Monday, March 3, 2014

Release the Photos with Studio J!!

You've seen some of my Studio J samples.  NOW is the time for you to try the powerful program and see how quick and easy it is.  Why do I say "NOW"?  Because for the month of March 2014 you will receive a discount per layout.  Instead of paying a mere $6.95 you'll only pay $5!

Watch this quick video to see that Studio J is not just for layouts anymore too.


72 pictures for $5, in the right size for those smaller spots without having to take a far away picture and crop? Wow!

Ready to try?  Go to Studio J right now.  There is nothing to download.  And it's ready for you anytime you want to work on it with internet access.

Live locally in the San Diego?  Come to my Studio J workshop class once a month at Creekside Elementary School (near Poway).  The next class dates are from 7 to 8pm on March 20th, April 17th, and May 15th 2014.  For $5 donation each month, I'll show you a feature of the software as you create your layouts.  Come to learn more after you've explored or created on your own.  Go now... : )

It's time to release those photos from your computer so others can see them too!  Go now...