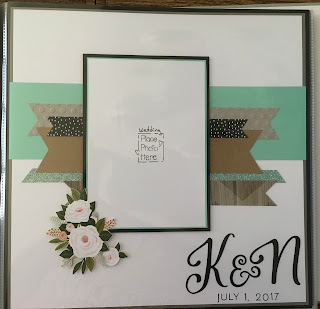
This is the front page. It will hold a 5" x 7" picture. My niece wanted Sea Glass. I added the grays, browns, and blacks. When I learned that her flowers were going to have coral in them, I turned to the Hello Lovely (retired) paper and fussy cut the flowers for each of the layouts.
This back page also holds a 5" x 7" picture. The saying is from a retired stamp. I thought it appropriate for the last page of a wedding. The front and back photos are double matted. A very small frame of Sea Glass is between the black and white.
The following are the two page layouts. There is a lot of white space for people to write things. Some of the papers were Rustic Home Fundamentals, Sea Glass cardstock and glitter paper, Some KindaWonderful B&T, Desert Sand cardstock, Whisper cardstock, Black cardstock, Live Beautifully B&T paper, Rustic Home Ribbon, and Washi tape.
Each page is double matted. The base page is 12" x 12" of Black cardstock. The next layer is 11 1/2" x 11 1/2" of Slate cardstock (the groom was going to wear a gray suit). Then the 11" x 11" White Daisy cardstock.
 |
| pages 2 and 3 |
 |
| pages 4 and 5 |
 |
| pages 6 and 7 |
 |
| pages 8 and 9 |
 |
| pages 10 and 11 |
 |
| pages 12 and 13 |
 |
| pages 14 and 15 |
Some techniques I used:
- embossing (front and back cover)
- embossing and then sanding (pages 3 and 4)
- direct to paper inking (pages 2 and 3)
The strips of paper I used varied from 1/4" (going with the central background strip) to 3 1/2" (central background strip). The banners ranged from 1/2" (washi tape and ribbon as well as paper) to 2 1/2". Most were 1 1/4" to 1 3/4" I believe. Each was bannered about 1/2" upward.
Since pictures were not going in beforehand (my niece wants to put wedding picture in), I varied the orientation. I stamped "place photo here" so people wouldn't sign there. The single Black mat was cut at 4" x 6" and the white area is 3 1/2" x 5 1/2". The 4" x 6" pictures will need to be trimmed down.
I raised the flowers with Thin 3D Foam so that pictures could be placed beneath them.
So, THANK YOU, Karen Pederson (her original post on her blog), for sharing this with us! I'm so grateful because I've started a new tradition in my neck of the woods. And curse you, for sharing the idea with us, because now I'll be making more. : ) Of course seeing the expression of the bride and groom, and hearing the oohs and aahs of guests, the effort was well worth it!


No comments:
Post a Comment