Showing posts with label Stamp of the Month. Show all posts

Wednesday, September 12, 2018

Accordion Cocoa Holder with Candy Cane Holder

I was asked to create a cocoa packet holder after I made a tea accordion holder.  This is what I came up with.

I must say, I really like the versatility of the September Stamp of the Month!  Fun sayings and supporting pictures.  : )

Just Treats - September Stamp of the Month S1809


This is my finished project.  It is held closed by hook and loop dots (Z1805).  You could punch some holes and tie ribbon/twine if you'd like too (the cocoa packet goes up pretty high).

The pattern of the front was taken from Make it From Your Heart Volume 4 (9044).  Pattern 16 on page 36.  I just elongated the background piece to span the whole side (5.25")


These are the pieces necessary to put this together, minus the front.

The candy cane holder and the sides are scored every 1/2".  The holder is folded as shown.  The two higher upward facing pieces get adhered at an angle to one of the dividers (you can see the cane peeking out in the above picture).

Accordion fold the sides. Position them across from each other so that the folds mirror each other (I had the farthest fold from me mountain facing inward while the closest fold was a valley fold outward). The important thing is that the two sides are mirror images of each other.

Glue the dividers to one side, being consistent with where you glue. Also, try your best to have the bottoms of the dividers match one another. Go back and glue the other side onto the dividers.

Decorate the front of the outside piece with all of the flat items. My mints and candy cane are raised so I waited to add those until I was done.

Glue the accordion sides to the front and the back of the outside shell. I’d suggest one corner at a time. They should fit inside the shell. If not, you can just trim the excess after the glue dries, or bring the sides in a little bit.
An alternative for this is putting three cocoa packets in instead of the candy cane and marshmallows.

For this project, I used Candy Apple (X5992), White Daisy (X6027), and Fern (X6003) cardstock; 'tis the Season paper packet (X7239B); Just Treats SOTM (S1809); Candy Apple (Z6509) and Black ink(Z2805), and Carmine marker (Z2448).

The stamp set is only available until the end of the month - September 30, 2018, so don't delay!!

Monday, June 11, 2018

A Bushel & a Peck SOTM for June 2018

I'm actually posting!  I haven't been idle crafting, but posting has been a back seat to life...


Here is the stamp set of the Month "A Bushel & a Peck".  Super cute gal.  I can see her colored in winter colors and showing up on a Winter layout.  Or in the fall with the blowing leaves.

With the "I love you a bushel and a peck", this card could be used for an anniversary or Valentine's day.

This stamp set is only available in June 2018, but it's uses far outlast the month.


This is an example made by Close to my Heart using the girl.  They used markers to color the girl, sign, apple, and leaves.

Change the saying to "you're the apple of my eye" and you can give it to your daughter for a thinking of you card or birthday.


I made this card.  The saying could easily be changed to one of the other ones and this card can be given to your son (or daughter).  It is also an example of a thank you card.

I used Splash of Color (D1733) stamp set to create the blotches of color with second generation Peacock (Z2849) ink.  Under the basket there is a Toffee (Z2828) scribble from the same stamp set.

The pattern is from Make it From Your Heart Vol. 4 (9044).  It's pattern #4 that's been rotated 90 degrees and then the banners were flipped.

Nutmeg (X5951) cardstock was sanded and bannered.  The dotted B&T paper the saying is stamped on is from Fresh Air (Z7232B) paper packet.  The bottom striped B&T paper is from the Enchanted Fundamental (Z3352) paper packet.  Glacier (X5979) and White Daisy (1385) cardstock were cut out using the Thin Cuts - Basic Circles (Z3318).  The bushel of apples were stamped using Archival Black (Z3271) Ink on scrap White Daisy, colored with pencils (3505), blended with water using our waterbrush (Z3225), cut out, and (finally) mounted using Thin 3D Foam (Z2060 or Z3341 - thin dots).  Lastly, the Bronze Sequins (Z4029) were added.

What will you create?  Order yours before June 30, 2018!

Thursday, February 15, 2018

Sunny Thoughts Envelope Bag

A fellow consultant challenged me the other day to make something from a box of Kraft colored envelopes.  While we were talking about potential projects, she teasingly asked if I remembered making bags out of envelopes.  She gave me a box of the envelopes, "downsizing" she said.  ;)

I do remember the days we created a bag from an envelope and set out to do just that again.


Let me walk you through how I created mine:

Seal the envelope. That's simple enough.  The flap will allow the bag to be closed rather than drafty.

Cut the envelope - usually in half, to create an opening for the bag.  These envelopes are 11" long by 4.75" wide, and I didn't want my bag that tall.  I cut the envelope in half anyway.  Then I cut an additional 0.25" (from the cut side), twice, for my handles.  And then I just cut off some more so that a gift card would just sit inside the bag.  Therefore, before scoring, I cut the envelope to 4.25".

Score the bottom and the sides.  The first one I scored at 0.75" on the bottom and 0.75" along each side.  I decided it was too wide for me, so I scored this one at 0.5" on the bottom and 0.75" along each side.
Fold on the score lines, really well, folding in the both directions.  Your bone folder really helps here.

Create the bottom.  Now that you've folded the score line really well, open up the envelope.  You will have the natural envelope edge in the middle of your two scored lines.  And as you square the bottom off, you'll notice you have a triangular section forming below the bag.  That's good!  Those triangular sections will get folded and glued to the bottom of the bag.  Use a bone folder to get into the corners of the bag.
You'll also notice the sides of the bag forming too.  Those are created from the scored lines along the side.  Go ahead and define the sides more too.

Decorate!  I thought the color of the Kraft matched our Gimme Some Sugar paper (X7228B) really well, so I went with that.  : )
The "You are the Sunshine in my pocket" stamp is one stamp, so I stamped it once on a 2.5" circle (thin cut Basic Circles - Z3318) in Peacock ink (Z2849), cleaned it, and stamped it again on scratch White Daisy using Tangerine ink (Z2809).  I used a paper trimmer to cut just below and above the dotted lines (highlighting "SUNSHINE"), bannered the edges, inked the edges with Tangerine, and mounted it with Thin 3D Foam (Z2060).  I also inked the edge of my circle with Peacock ink.
For the single flower (that's a single stamp too),  I stamped it once in Tangerine ink, and created a second generation with Juniper ink (Z2865).  Have I ever mentioned that I'm anal?!  I cut around the Tangerine flower, and when I cut the Juniper image, I cut off the ends of the flower.  Most of the Juniper flower is still there, for placement and anchor, of the Tangerine flower that I glued directly onto the Juniper flower.
For the handles, I cut them shorter, removing the envelope flap.  I used the bone folder to create the curve of the handles.  That's achieved the same way you curl curling ribbon with scissors.  The bone folder doesn't damage the paper though.  : o  Bonding memories was applied to the ends of the ribbon to adhere them to the bag.

Fill it!  Put a small surprise in your bag, and watch the recipients face light up when they receive the bag!  : )

Sunny Thoughts (S1802) has additional good stamp images.  It's only available through the end of the month.  Don't wait, we're halfway through February already!!

Friday, September 1, 2017

Feel So Blessed - September 2017 SOTM

September is going to be a banner month!  Let me start by showing you the Stamp of the Month.


This thankful card was created using the September Stamp of the Month - Feel So Blessed (S1709).


I was inspired by a pinterest card that was in the other orientation that had a strip running the length of the card with the saying to the right of the strip.  My card looks nothing like the inspiration.


How did I make my card?  Simple...
I stamped the border image from the set in Eggplant (Z2347) toward the top of the card base.  The adhered B&T paper is an Almond piece from our Basic Fundamental Papers (Z3353), which measures 1.5".  Then I stamped the border stamp below the B&T paper.

Next, using the Basic Circle Thin Cut (Z3318), I cut out a 2.5" Eggplant circle from the the Enchanted Fundamental Papers (Z3352).  I cut a 2" circle of White Daisy as well. "Thanks" was stamped on the White Daisy circle in Almond ink (Z2827).  On a scratch piece of paper, I stamped "for everything" in New England Ivy ink (Z2835).  The circles are adhered directly to the card front.  The banner, after being cut out, was raised with Thin 3D Foam (Z1151).

I didn't just want to add plain clear Sparkles (Z3274 (4mm) and Z1263 (2mm)), so I colored them with our Shin Han Markers; Green Sap (Z2463) and Lavender (Z2453).  I added those around the sayings.

Simple and fast!

Here, let me show you all of the stamped images within this set and you will see I barely used the set to it's potential!


What will you create?!


Sunday, June 25, 2017

June 2017 Stamp of the Month

Before the month ends, you should see the stamp of the month set and a few examples.


S1706    Hello Foxy Stamp Set
X7219B  Little Dreamer paper (zip strip)
1385        White Daisy Cardstock
Z3271      Archival Black Ink
Z3216     White Twine
Z3274     Clear Sparkles
Z1263     Bitty Sparkles
Z3132     Watercolor Paints
Z3132     Paintbrush Set
Z2060     Thin 3D Foam Tape


S1706    Hello Foxy Stamp Set
X7219B  Little Dreamer paper (+ zip strip)
1385        White Daisy Cardstock
Z3271      Archival Black Ink
Z3216     White Twine
Z3321     Little Dreamer Gems
Z1263     Bitty Sparkles
Z3132     Paintbrush Set
Z2060     Thin 3D Foam Tape

Thursday, May 18, 2017

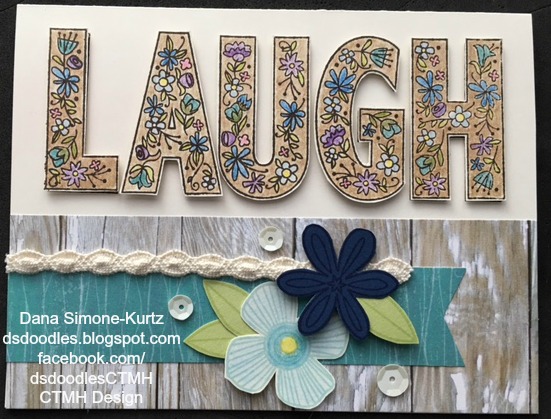
Watercolored Laugh Floral May 2017 Stamp of the Month Card

I fell in love with the stamp set as soon as I saw it.  Have you seen it yet?!  Let me show you!


The words are large, but still fit on a card.


Here is my sample of which I'm happy with.  It makes me smile whenever I see it!  : )

I modified an old pattern for this card and updated with new papers, so it looks fresh.  Don't you love it?!

See how the letters are large, but still easily fit on the front?  Each word is one stamp so you won't have to worry about lining up each letter.
I knew that I was going to watercolor the letters so I stamped "Laugh" in Brown Staz-on ink (Z1142).  I chose Brown because of the beachy look I was feeling.  The letters and flowers on the letters were colored with our Watercolor Pencils (3505).  The background is Desert Sand, and the flowers are Hydrangea, Crystal Blue, Citrus Leaf, Bubblegum, Ocean, Sunflower (for the centers), Sunny Yellow, Olive, and Star Spangled Blue.  Then the background was softened with the Tombow Blending Pen (3174) - thus the reason for the Staz-on ink (no bleeding).

The wood plank background and texture paper, cut at 2" x 5.5", is from No Worries paper packet (X7220B) as is the Lagoon water B&T paper (cut at 1" x 4.75").  The stand alone flowers and leaves:  The dark one is Sapphire ink (Z2848) on Sapphire cardstock (X5775); Glacier ink (Z2841) stamped on Colonial White cardstock (1388) and colored with Crystal Blue and Sunny Yellow (with a hint of Sunflower); and Sweet Leaf ink (Z2853) stamped on Sweet Leaf cardstock (X5639) -  all cut out by hand.  The Sapphire flower and one leaf are raised with Thin 3D Foam Tape (Z2060).

The ribbon comes from the Rustic Home Ribbon Pack (Z3292).  I cut off the extraneous part of the ribbon - again, I was going for beachy.  Lastly, I added the sequins from No Worries Sequins (off white) (Z3322).

Did you spot the difference between the cards?  I started with the top one by stamping directly onto the card front.  But after adding the bottom papers, flowers, and embellishments, I didn't like how the word was lower than the rest.  So I colored and cut a separate word then mounted each letter with Thin 3D Foam Tape.  A little more time and labor intensive....  So, for the bottom card, I cut a 2.25" x 5.5" piece of Colonial White cardstock and stamped "laugh" on it.  That piece of cardstock was then mounted on the top of the card with the rest of the goodies.  "Laugh" is now on the same level, and I'm happy!

Now it's your turn to go create something with these awesome products.  You might need to purchase them first, though.

Friday, March 10, 2017

Good Times... March Stamp of the Month Card

Since I was super late last month posting a sample, I'm getting it done early this month!

I'm super excited about my card.
Let me tell you about it.  This is the front of the card, made from Make it From Your Heart Volume 1 (pattern #25).  The striped paper is from the Whimsy Fundamental paper (Z3255) - I think we tend to forget about those great Creative Collections.  Sweet Leaf (X5771) and Glacier (X5770) cardstock finish off the colored paper (along with White Daisy(1385)) for the card.  The tea cups and flower were stamped with Memento ink (Z899) because I was going to add water.  The saying I just used Black ink (Z2805).  And I stamped the whole saying in Glacier ink (Z2841) on the Glacier cardstock for some visual interest.  Speaking of visual interest, I sponged the bannered Sweet Leaf and Glacier with the respected colored ink (Sweet Leaf's part number is Z2853).

I added dots with the journaling pen (Z1767) to finish the front and to add the saying inside.  The cups and flower were colored with the watercolor pencils (3505) -- Sunkiss Yellow, Spring Iris, Crystal Blue, Citrus Leaf, Bubblegum, and Holiday Red -- and blended with the Small Round Waterbrush (Z3224).  I've really been enjoying watercoloring!


My original intention was to stamp the flower on the bottom right of the saying.  Unfortunately, I didn't do a good job of masking "Good times" and a little of the bottom showed.  So, my flower went above the saying in an attempt to hide some of the black.  It mostly worked, but it's overlooked because of the flower.  : )


I used just three of the 11 stamps in this set.  Tea-rrific (S1703) will work well with tea and coffee lovers.  Here is the entire stamp set.
Isn't this a cute stamp set?  You can add a tea bag to the inside of the card as a thank you.  A gift card can go inside too.

Tuesday, February 28, 2017

January Stamp of the Month

I can't believe I made this card a month ago and haven't posted it!  Better late than never.  : )  Although you still have today to order your set.


Here is the entire set Easter Bunny S1702.

From my example below, you can see that it doesn't have to be Easter specific.

The saying Happy Spring is nice, especially with all the rain San Diego has been getting.  Spring and warmer weather would be nice.  It rained ALL DAY yesterday.  My trash can collected about 12" inside.  I know, poor baby!  It rained for 1 whole day.  And the temperature was only in the 50s - for 1 whole day...  ;)


 I incorporated Hello Lovely paper when making this card.  The pattern comes from Make it From Your Heart Volume 2 (9042) pattern #25.  The papa bunny was colored with watercolor pencils (3505) and blended with the small waterbrush (Z3224).  Because I used water, I stamped Papa in Memento Ink (Z899).  The background cardstock is Glacier (X5770).

So, if you want the set, order today!  If you want a free exclusive ink stamp pad (your choice) get your subtotal to equal $48 on my birthday gathering.  Heck, make it $50 and the stamp set is only $5 (instead of $17.95).  This set will be gone tomorrow!!

Sunday, February 12, 2017

A Little Love


This little sample uses January 2017's stamp of month and Sugar Rush paper.  Sorry I didn't get this posted last month.  : (

A cute card either way for Tuesday.  : )  You can make it to go with yesterday's Ferrero Rocher Box project.


This little beauty is a 3" x 3" called Squares and Overlays (found on page 65 of Originals).  The three 1" x 1" squares on the left side are Raspberry, Whisper, and Blossom cardstock paper.  The Slate heart is made by taking the printed flower (stamped in Blossom above it) and turning it over to get a solid image.  Both hearts were cut out.  The Blossom heart was raised with Thin 3D Foam.  The Dreamin' Big sequin finish off the card.

Tuesday, January 3, 2017

Happy New Year!

The good and the bad of taking time off, is that now I feel like I'm really behind!!


January is National Papercrafting Month, so we are celebrating with a FANTASTICALLY simple Succulent Wreath.  This kit comes with pre-cut pieces that you simply pop out, glue together, and attach to the sturdy chipboard wreath base.


There are 4 ways to get this kit, 3 of which is to earn it for FREE*!
  • You can purchase the kit for $18.95.
  • You can get it FREE* with a qualifying $60 order (pretax)
  • If you host a GATHERING in JANUARY that reaches level 2 or higher of Hostess Rewards, you'll get it FREE*, or
  • Become a CONSULTANT in January, and the wreath will be part of your New Consultant Kit!


We also have our Seasonal Expressions 1 book now available to order from (through April)!  The papers are fabulous as are the stamp sets.


And our January Stamp of the Month - Adore You - can be ordered now.


* Shipping and taxes are, unfortunately, collected for the free products.

Saturday, September 24, 2016

Beyond Blessed - I LOVE This!


I have to share this artwork from corporate using the September Stamp of the Month.  I haven't gotten around to duplicating it, but I want to make sure you see it...

It could be easily made into a card too.


The stamp set used to create the above:


All good things must come to an end.  This stamp set is only good through the end of the month.  Just one more thing you should seriously consider buying before Sept. 30, 2016 (10:59pm Pacific Time)

Friday, September 16, 2016

Beyond Blessed - September 2016 Stamp of the Month Sample

Here is my latest creations using Beyond Blessed (S1609).  I was making cards for a team meeting swap.  I started with the simplest of the three.  It was okay for me, and for most people.  But, as I looked at it, I thought it was missing something.  I thought I'd add some vines.  That's my second (middle) card.  I was happy with that one!  And that's the card I made for my exchange.

However, while I was assembling those cards, I thought how neat it would be to add some leaves.  I admit that the third card is a bit over the top - and I'm okay with that because I love the way it turned out!

Let me tell you a little more about each one.  The three cards have a few things in common.  First, the card pattern came from Make it From Your Heart volume #2 and is pattern #20.

The card bases background is from the Rustic Home Fundamental pack (Z3262).  You can see two different sheets were used, both equally pretty.  I embossed the saying in Gold embossing powder (Z2066) - VersaMark ink (Z891) to hold the powder - on New England Ivy cardstock (1282).  That was then sponged distressed with New England Ivy ink (Z2835).  The Colonial White(1388) mat was stamped in Saffron ink (Z2751) for the leaves and Goldrush ink (Z2223) for the berries.  The mat was then sponged distressed in Goldrush ink.

The accessories you see once were clear sparkles (Z3274 (middle sized), Z1263 (bitty sized), and retired for the large sparkle).  But I didn't want see through, bright accessories.  So I colored them.  I found that by first coloring them with Marigold ShinHam marker (Z2457) then the  Metallic Gold marker (Z1768), the Gold looked a little more rustic.

Each pumpkin was stamped twice.  The first time I used Saffron ink.  I waited a little bit (maybe 5 minutes) and then applied a rolled Goldrush ink layer.  I can do this because of the awesomely clear stamps and blocks!  I just lined up the image and pressed.  : )  Now, I rolled in Goldrush to give the pumpkin some dimension.  That was good.  I waited about 5 minutes because the Saffron and Goldrush are so close together that when I inked in Saffron and rolled in Goldrush, then stamped, the color difference was lost.  Not good.  By waiting the 5 minutes, it allowed the Saffron to dry and be absorbed into the Colonial White cardstock.

My simple card's pumpkin was cut out from Artbooking Cricut Collection (Z3169).  It's found on page 73 of the booklet or row 4 column 6 (R4C6) on the keypad.  It's also under the ICON key.

I colored the top of the cut out image with Sap Green (Z2463), using both the fine tip and broad tip of the ShinHam marker.

I added some Thin Foam Tape(Z2060) to the back of the pumpkin, and placed it on.

The background mat is Ruby from the Enchantment Fundamental pack (3254).  I love the versatility of the new papers in the Annual Inspirations book.


This card isn't too far off from the simple card.  I just wanted to add a little more to the pumpkin.  I found that inspiration from the page in the Artbooking booklet with the vine and leaves.  Page 72, BORDER, row 4 column 5.  Shift gets the leaves by themselves.

My first attempt, I just cut out the vine in New England Ivy.  My daughter didn't like how it disappeared into the "Thankful" (I had it on the other side originally).  That led me to cutting the vine in Fern cardstock (X5777) and the leaves in New England Ivy cardstock.  Since I cut the images out in Design Space, I removed the hearts from the vine's leaves.  I wanted (and did) to color the centers with Gold Metallic marker to incorporate more of the gold color.  It's hard to see in the picture, but each leaf has a gold heart.

To attach the small New England Ivy leaves, I use bonding memory glue (in this case the small tipped one - Z553) to the leaf and glue it onto the corresponding vine's leaf.

Like I mentioned, while I was putting the vines together, I thought "how cool would that be to have the pumpkin in a bed of fallen leaves?!"  The leaves are also from Artbooking and on page 72.  They are just one leaf, cut out multiple times.  This is the base of the leaf found under ICON.  They were cut from Colonial White cardstock.  I sponged each of the leaves with different colors.  Each got a Saffron base.  Some got just Goldrush.  Others got Goldrush and Ruby (Z2870).  Still others got Eggplant (Z2847).  Two I added Eggplant and a little bit of Sapphire (Z2848).  Then I glued some directly to the paper while others I used Thin Foam Tape to pop a little.

I used two vined leaves for this card too.  I cut one vine off just above the middle leaf as well as the connector from the small leaf to the middle leaf with scissors.


The pumpkin was hand cut.  The stem is New England Ivy ink.  The background mat is Pomegranate.  Honestly, I was going to use Pomegranate for all of my cards, but I accidentally cut the Ruby paper.  It was a nice mistake.  : )  And originally I was going to use Gold Sequins with this card.  But I forgot that.  I like the Gold Metallic colored sparkles though.

So, which is your favorite?!  And don't forget that this stamp set is only available until the end of the month.


Monday, July 18, 2016

July 2016 Stamp of the Month

This month features From the Notebook (S1607) which is a great set for accenting pictures and images.  The set is compatible with the Artistry Cricut Collection.  Here is the stamp set accompanied with some samples.  There is more examples on my website.  : )


Available now until July 31, 2016.

Wednesday, May 11, 2016

Celebrate with Cake Stamp of the Month - May 2016

Before the month disappears on me (yes, I know we're not quite half way, but it was just February yesterday)!

Here is another versatile stamp set (S1605) that can be used for weddings, anniversaries, birthdays, and anything else you'd celebrate with cake (graduation season is around the corner).

Here's my card using the set, which I teamed up with the Magical Paper Packet (X7209B):


This pattern #20 is from Make it From Your Heart Volume #2.  The dark blue strip is actually Sapphire cardstock (X5775).  "Celebrate" is stamped on it in Black ink (Z2105).

Next, I stamped the candle and cake slice with the Black Pigment Ink (Z2503) on scratch White Daisy cardstock.  I added Super Fine Clear Embossing Powder (Z2088) over the images and heat embossed them.

For the stand, I inked that up with VersaMark ink (Z891) and heat embossed with Silver Embossing Powder (Z2067).


Coloring was done with the ShinHan alcohol markers:

The candle is colored with Carmine (Z2448), as is the base of the flame.  The flame is finished off with Golden Yellow (Z2452).  The stand was treated to Turquoise Blue (Z2465).  The accents were hit with Warm Grey 4 (Z2467) and then the Colorless Blending Pen (Z2469) softened the color a little more.  The cake icing was colored with Marine Blue (Z2458) and then the cake was highlighted with Warm Grey 4, softened again with the Colorless Blending Pen.

Then all three elements were cut out (I highly recommend our Micro-tip scissors - Z534 or Non-stick Micro-tip scissors (Z1836).


The finishing touches:

I added the candle to the back of the cake - only half of it is exposed because I didn't want it to disappear in the dotted background. The cake stand was adhered directly to the card base.  The Cake received some Thin 3D Foam (Z2060) and the tip of the candle got 3D Foam (Z1151) to add a little more dimension to the image.

Calypso Sequins (Z3215) - black and white -  were added as accents, and done!!

Saturday, February 27, 2016

Easter Box from Artiste Cricut Collection

How about this adorable Easter box?  Would you like to make this for your kids, friends, coworkers, and neighbors?  It's simple... let me show you how I did it.

 Like the title says, this comes from the Artiste Cricut Collection.  It can be found on page 73 of the book (the "Spring" key).

This guy is 9.5" high.  I cut it out with White Daisy for the bunny to be white.

The pink, purple, and green tape you see is from the Limeade Washi Pack (Z3198).  That is a three pack with 1/4" Thistle, 1/4" Pixie, and 1" Pear striped pattern.

The Pear polka dots are from February's Stamp of the Month (believe it or not).  And the "Happy Easter" is from the Artistry Cricut Collection (that one has lots of words), and is stamped in Canary ink.


After my Cricut cut out the piece (it's one piece), I folded along the score marks.  The Thistle washi tape was placed just under the scored part of the side (see above picture).  Under the Thistle, I added the Pixie washi tape, butting them next to each other.  I then folded the sides of the box and trimmed the excess washi tape.  I repeated the process for the other side.

Next, I folded the curved flaps up and placed a post-it note across the flap to mark where the Pixie washi tape hit.  I kept the note there while I stamped the dots in Pear (the dots would show up under the washi tape if I hadn't masked the area with the post-it note).  After I removed the post-it note, I had a line for where I could add the Pixie (and subsequently Thistle) tape.  The two colors wrap around the whole box. Repeat for the other side.


The Pear washi tape started where the Thistle washi tape ended, but I applied it perpendicular to the Thistle tape (it will make sense if you look at the direction of the stripes).  There is a slit in the flap for the bunny to fit, and I chose the size of the box so that there would be 1" on either side of the slit.  That way I didn't mess with another strip of washi tape.  (This isn't to say you can't make the bunny larger and just line up more tape.  I just didn't want to do it.)

Being me, I lined up the stripes of the washi tape when I layed the second side of tape.  The last part to finish the flaps was to turn over the flap and cut off the excess washi tape.


Last thing I did was add a Pixie nose to the bunny by inking up the same dot stamp.  Most of the stamp is off the bunny.  I had added an eye with the same method but it was out of proportion so didn't do it again.

That's it!!  Fill the box with little goodies (chocolate is a favorite) and then nudge the bunny through the slits.

For this, I put the nose and ears through first (the tail wants to take cuts).  I found this the easiest (and less frustrating) way to do it.


I hope your try making one today!

Friday, February 5, 2016

February 2016's Stamp of the Month


These Balloon Animals (S1602) will have your mind reeling with possibilities.  Here are a couple of my takes on the stamp set...


This little darling utilizes Kaleidoscope paper and colors.  Penelope's color scheme works right with Kaleidoscope colors too.  The pattern is from my February's Charlotte Workshop.  Colors are Canary, Pear, Pixie, Whisper, and Thistle.  I used Limeade Washi tape (Z3198) under the Gold Foil tape (Z3129).


This birthday or baby shower card comes from the Regatta paper and Make it From Your Heart Volume 1 (pattern #23).  Colors here are Sapphire, Pomegranate, Glacier, and Bamboo.

All of the cardstock pieces have been sponged with Bamboo ink.  The monkey is mounted with thin 3D foam.

Saturday, January 30, 2016

Not too late for January's Stamp of the Month

It's still January, so you can still purchase the January Stamp of the Month.  If you weren't convinced before, see if this example doesn't put you over the top...


I used the baby's breath within the stamp set (at least that's what I see it as) and "love you!"with this simple card.
January Stamp of the Month set


Let me walk you through how I made this...

First of all, the card was inspired from a pinterest post, which in turn came from another pinterest post (no website listed).

I cut a 2" x 4.25" piece of White Daisy cardstock.  Using VersaMark ink(Z891), stamp the baby's breath twice (I went with different heights), pour White Embossing Powder (Z2068) on the images (tap off excess), and heat (Craft Heater Z555) the powder.


Next, I started with Cranberry Ink(Z2116)(the darker red color) and Sponge Daubers(Z726)*.  Moving in a circular pattern, rub on the Cranberry ink around the sprigs and in the corner - wherever you want it, really.  Definitely don't go straight from your ink to the project, though.  You'll end up with some very dark spots.  Repeat with Pomegranate ink(Z2653) (purplish hue) and then Poppy ink (Z2652) (bright spots) (I used this one sparingly).  Note that there are sections that don't have any ink.  *When I do this again, I'll use our Sponge (Z697)instead of the Daubers.  The Sponge is much stronger for this type of job (applying in a circular motion).  The tops of my used Daubers crumbled off.

The last step before assembling, is to stamp the breath.  I stamped first generation with Cranberry ink.  I cleaned the stamp, and added second generation (stamp off on scratch paper first) breath in Pomegranate ink.  You can see I stamped at different heights to give it more depth (that's what the second generation stamping does too).

Adhere the strip to the card front, and stamp a saying below (Cranberry ink for this card), and whalaa, your card is done!

I'm thinking this will be my Valentine's card to my husband.  It says "I love you" without being too lovey dovey.  Although, he's seen this card, so I might have to come up with another one.  Too bad!

Right... I got carried away with telling you how to make this card that I almost forgot to remind you that you have until Sunday at 11pm Pacific Time to order this set.  This set would allow you to make a great Anniversary card too!