Monday, November 5, 2018

One Page Scrapbook

My upline, Kay Pekin, sent me this scrapbook last year.  It was made from one 12" x 12" cardstock paper and several cut papers.
 I liked it so much, in fact, that I recreated it and had other consultants make samples of it.  I used what was updated paper, but it's easy enough for you to use any paper you have.

Updated version (but since retired):
As you can see, I didn't want to use ribbon - making 15 kits, it would be too much.  Instead, I used hook and loop to make a closure from the back.  If I were making this a specific themed book, I'd add the theme or person it was about under the flap.  Then it would be a sweet surprise upon opening!

Let me show you a little more of the meat...

This is opened up completely.  The bottom three sections could be used for journaling or some smaller pictures.  I went with two background and texture papers, but you can do more if you'd like.

You need a total of:
10 B&T papers each measuring 3.25" x 4.25"
10 cardstock each measuring 3.5" x 4.5"
6 cardstock each measuring 3.5" x 2"
1 white cardstock (for front) measuring 3.5" x 4.5"
Band cardstock measuring 1" x 5.5"
Band B&T paper measuring 0.75" x 5.5"


This is the view with the six flaps folded into the middle section.  The right side is folded into the middle, followed by the left side, and you see the front.


Let's score the 12" x 12" paper...
On one side, you'll score at 3 3/4", 4", 7 7/8", and 8 1/8".
Rotate the paper 90 degrees, and score at 2 3/8" and 7 1/4".

Fold on all score lines.  Cut out the small sections (as seen above).

Once you've adhered all the paper to the book - NOTE: don't adhere the last cardstock piece to the back yet!  This will cover the band end - you're ready to add the band.  Adhere the B&T piece to the cardstock.  Add the Hook and Loop Dots (Z1805) to the one end of the band and the front of the book.  Finger fold the band around the edge of the book.  Adhere the back of the band to the back of the book.  Then adhere the cardstock over the band giving the back a clean look.

Decorate the front of your book.  Here, I used the Stitched Oval (1.75" size) thin cut (Z4187), cut flowers, and sequins.

If you have gifts to give, this is an easy one to knock out several at a time.  They're appreciated too!

Tuesday, October 16, 2018

National Boss's Day Gift

Today, October 16, 2018 was National Boss's Day.  I made these for my boss.  Yes, I'm a kiss up.  : )
I cut the words from vinyl after typing them into Design Space, and put them on the clipboards.  I covered the tops of the pad of paper with B&T paper.  Even though the papers cover the quotes, it's fun to take the pads off and be inspired.

Voila!  Instant gifts!

Monday, October 15, 2018

Modern Wedding Card

This month's challenge was to make a wedding card or baby shower card.  I went to Pinterest for inspiration and found it!

The card on Pinterest was an all white card with the "&" in rainbow colors.

I loved the way the card was constructed, clearly, because I modified it.  : )


On Design Space I sized the square I wanted.  Next, I added the "Mr", "&", and "Mrs" to the system.  I played around with the font and sizes until I liked the look within the square.  In order for the "Mr" to get cut out of the square, the square and the "Mr" need to be attached (with "Mr" where you want it within the square).  "Mrs" and "&" are two separate colors so they each get their own mat for cutting.

Mrs is cut from White Glitter Paper.  The Ampersand (&) was cut from the fundamental basics (retired).

I cut the Blush Satin Ribbon (retired) only long enough to wrap by about 1/2" on each side (I don't want to waste ribbon where you don't see) and taped the ends to the back of the Charcoal square.  A smaller length of ribbon was tied around the taped ribbon to create the knot.

Ampersand was glued directly to the Charcoal cardstock.  Mrs. received  thin 3D foam tape (those non stick micro-tiped scissors - can't say enough good about them!).  Mr. Square was also raised with thin 3D foam tape.  But before Mr. Square was adhered to the base card, Black cardstock was glued to the base so that "Mr" would be backed in black.

Modern and Classy!

Tuesday, October 9, 2018

Let it Snow

Today I thought I'd share a home decor item that I've proposed to teach at the Poway Adult School in January.  I'm waiting to hear back if they'd like to offer it to the public.

 This has to be big so you can see the glitter paper on the "o".

"Let it" has been cut on the Cricut after being designed and welded on the computer.  The "s" also received a sponging of White Daisy Ink (Z2863) around the letter.

"N" is sporting paper from JoAnn's store.  I really wish we had something like this - it's super fun and fits the project so well!


Like I mentioned already, the "O" is from our White Glitter Paper (Z3237).  I love the sparkle.

"W" has been stamped with Pansy ink (Z2804) on JoAnn paper (clearly I was shopping when I picked the papers out.  I blame the snowflake paper).  The snowflakes are Falling Flakes A1223.


 Let me back up a little bit.
After I chose my colors, I traced each letter on the appropriate paper, making sure the front of the letter kissed the back of the paper.  The line around the letter was as close to the letter as possible.

Next I cut each of the letters out, staying on the drawn line.  If you are going to stamp, now is the time to do it.  I actually stamped the snowflakes before I cut out the "W".

I applied mog pog to the letters (rather than the paper) one at a time.  Then I placed the cut out paper on top of the mog pog.  The mog pog allows you a little bit of time before setting in order to place the letter where it needs to go.

After the letter dries, you can use a craft knife to cut excess paper away.  Although if you traced your letter close to the letter, you shouldn't have to cut.  You can also use sand paper (from the front to the back) to remove excess paper.

After making each letter pretty, I sponged the "S".

"Let" and "it" were welded and cut.  I used my non -stick micro-tip scissors (Z1836) to cut very thin pieces (and small) of thin 3D foam tape (Z2060) to prop up the letters.

This home decor will be going up in my home in January.  It should take a little sting from the empty mantel after my moose/deer collection gets put away.


The answer was, "we're going to pass ... for Winter [quarter]".  Oh, well, I still had fun making and sharing it with you!  : )

Wednesday, September 12, 2018

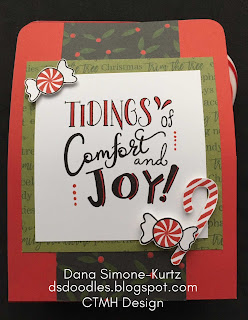
Accordion Cocoa Holder with Candy Cane Holder

I was asked to create a cocoa packet holder after I made a tea accordion holder.  This is what I came up with.

I must say, I really like the versatility of the September Stamp of the Month!  Fun sayings and supporting pictures.  : )

Just Treats - September Stamp of the Month S1809


This is my finished project.  It is held closed by hook and loop dots (Z1805).  You could punch some holes and tie ribbon/twine if you'd like too (the cocoa packet goes up pretty high).

The pattern of the front was taken from Make it From Your Heart Volume 4 (9044).  Pattern 16 on page 36.  I just elongated the background piece to span the whole side (5.25")


These are the pieces necessary to put this together, minus the front.

The candy cane holder and the sides are scored every 1/2".  The holder is folded as shown.  The two higher upward facing pieces get adhered at an angle to one of the dividers (you can see the cane peeking out in the above picture).

Accordion fold the sides. Position them across from each other so that the folds mirror each other (I had the farthest fold from me mountain facing inward while the closest fold was a valley fold outward). The important thing is that the two sides are mirror images of each other.

Glue the dividers to one side, being consistent with where you glue. Also, try your best to have the bottoms of the dividers match one another. Go back and glue the other side onto the dividers.

Decorate the front of the outside piece with all of the flat items. My mints and candy cane are raised so I waited to add those until I was done.

Glue the accordion sides to the front and the back of the outside shell. I’d suggest one corner at a time. They should fit inside the shell. If not, you can just trim the excess after the glue dries, or bring the sides in a little bit.
An alternative for this is putting three cocoa packets in instead of the candy cane and marshmallows.

For this project, I used Candy Apple (X5992), White Daisy (X6027), and Fern (X6003) cardstock; 'tis the Season paper packet (X7239B); Just Treats SOTM (S1809); Candy Apple (Z6509) and Black ink(Z2805), and Carmine marker (Z2448).

The stamp set is only available until the end of the month - September 30, 2018, so don't delay!!

Monday, September 10, 2018

October 2018 Workshop - Wall Art Part 1

When you come to the October's Workshop, you'll make the Autumn and Winter wall art displays.  Early next year, you'll make Spring and Summer (all four are pictured below).  Thank you, Holly Valerius for the inspiration!


Each 10" x 10" canvas sports a different painting effect as the base.  We'll start with those, and while the paint dries, you'll put together the layers above.


Cost is $20 to make these two.  Workshop dates are:

Monday Oct. 8th
Thursday Oct.11th

7 to 9 pm at my house.

Sign up deadline - September 29th

Can't make the workshop and are willing to make this on your own?  I'll be happy to send you the cut file for Design Space after a $20 (pre-tax) purchase from my website.


(For those who saw my samples, those are on a 6" x 6" canvas)

Saturday, July 7, 2018

Katie's Graduation Gift

The thing about playing on a high school sport's team is that each year players graduate.  It's kind of sad, really.  You get to know and like a girl(s) and then they leave.  Not quite right because my daughter stays and gets to know the girls staying that much more.  It gets harder every year.

Anyyywayy, Katie invited Lindsey to her graduation party this year.  Lindsey wanted to give her a gift that was small and something Katie could use in college.  A photo holder.

During the talking phase, the plan was to get some twine and some photo mats.  Put the mats on the twine.  It's portable and small.  Problem - how to adhere the ends to the wall in a dorm without it looking tacky.  We pushed forward.

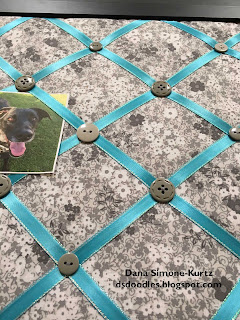
You've seen those ribbon photo boards, right?  How about something like that?  Lindsey does a little research.  They are at least $30 and rather large.  Lindsey wants something smaller for Katie, but likes the idea.  How about making our own?!


I have a couple of 12" x 12" frames.  I have cork board on a roll.  I have batting.  Grey fabric is purchased.  We don't even need a quarter of a yard.  Then ribbon to match.  We'll figure out what to put over the ribbon crossings afterward.

We use the mat that comes with the frame as our board.  The cork board is rolled out and cut, then stuck down onto the mat.  Batting goes on top of that.  The fabric is ironed and then stapled to the back of the mat.  At first we used the staple gun, but the staples were too long.  We were happily surprised when the regular stapler goes through all of the layers!

Next, the ribbon was laid out on the board.  3" apart (that's my girl!), and taped to the back of the board.  It was later glued with Liquid Glass.  Liquid Glass went behind the ribbon and attached to the fabric.  We needed to cover the intersections...

I have some old grey buttons - being a hoarder sometimes comes in handy!  Of course we don't have enough of the same button to cover the entire area, so Lindsey comes up with a pattern that works.  We find DMC floss that matches well, and then Lindsey sews through the layers to keep the buttons in place.

Everything gets into the frame and is closed up.  Lindsey prints a picture of Katie's dog and of the two girls.  She wraps the gift with love and has a great time at the party.

Katie will be missed next year.  She added much leadership and is a gosh darn good runner.  Much luck at Chico State, Katie!

We better start thinking of gift ideas for the several girls who are graduating next year...

Saturday, June 30, 2018

Stampaganza 2018 starts July 1st!

It's that time of year again!  For every two stamp sets you buy, you'll get a third stamp set free!*  And the solo stamp sets are making a limited-time appearance (just this month)!


You can host a gathering and earn free stamp sets too!


Or become a consultant and get some free stamp sets!


LOTS of choices!

Purchase any of the Solo stamp sets as part of Stampaganza in July for $9.95!  These aren't found in the Annual Inspirations book or the Seasonal Expressions book.

B1225 Solos “a”
B1226 Solos “b”
B1227 Solos “c”
B1228 Solos “d”
B1229 Solos “e”
B1230 Solos “f”
B1231 Solos “g”
B1232 Solos “h”
B1233 Solos “i”
B1234 Solos “j”
B1235 Solos “k”
B1236 Solos “l”
B1237 Solos “m”
B1238 Solos “n”
B1239 Solos “o”
B1240 Solos “p”
B1241 Solos “q”
B1242 Solos “r”
B1243 Solos “s”
B1244 Solos “t”
B1245 Solos “u”
B1246 Solos “v”
B1247 Solos “w”
B1248 Solos “x”
B1249 Solos “y”
B1250 Solos “z”

B1286 Solos “1”
B1287 Solos “2”
B1288 Solos “3”
B1289 Solos “4”
B1290 Solos “5”
B1291 Solos “6”
B1292 Solos “7”
B1293 Solos “8”
B1294 Solos “9”
B1295 Solos “0”

Purchase Solos stamp sets in a bundle for a discount!

CC7181 Alphabet Solos Bundle $258.70 now $159.20
CC7182 Numbers Solos Bundle $99.50 for only $59.70

* there are always exceptions and clarifications.

Exceptions (these won't count toward your purchase of two, nor toward a free set):
  • Stamp sets included in Cricut® collections
  • W stamp sets
  • Operation Smile™ stamp sets
  • Stamp of the Month stamp sets
  • Hostess Rewards stamp sets
  • Stamp + Thin Cuts bundles
  • Alphabet Solos bundle (CC7181) or Numbers Solos bundle (CC7182)

Clarifications:
  • The lowest priced stamp set will be the one that's free.  If you purchase, let's say, four stamp sets, you'll get two stamp sets free - the two lowest priced.
  • You still get to pay the shipping and taxes on the free set : (


Friday, June 29, 2018

Eclipse Birthday Card

I've see these cards on Pinterest and Facebook.  Well, I finally made time to make one!  This was for my Cardaholics group with the challenge of a birthday card.  I was inspired by the colors of Central Park paper packet.
I used our Thin Cuts - Block Alphabet (Z3386) for this.  I thought about using the Cricut, but decided it would be more accurate making them the "slower" way.  Even though it might sound like it took a long time, it wasn't really that bad.  Let me explain how I made my card...

The scene is on 3.5" x 4.75" and is backed by Pacifica cardstock (X5968) that measures 3.75" x 5".  First, create 2 masks of the balloon.  The balloon came from the stamp set accompanying the Art Philosophy Cricut Collection, but any balloon will do.  Why create two?  Well, because you'll want to cover two balloons at once to create the pattern.

I stamped all of the Glacier (Z2841) balloons first.  The I masked those (one at a time) to stamped the Poppy (Z2852) balloons.  I stamped one on scrap White Daisy cardstock too.  Then, I masked both of those colored balloons to stamp the Willow (Z2807) ones.  Looking at the "W" is a great example why you need two masks.  Finally, I stamped the Lemon (Z2808) balloons.  I tried not overlapping that one but did to go between the two Willow balloons (again 2 masks).

Next, I added the balloon strings.  I had to put the mask back on a few times.  And I added a string to my scrap balloon.

My Cuttlebug came out after the last step.  I laid "WISH" out and when I was happy, I added painters tape to the letters with overlapping tape.  NOTE: you'll want to have clearance on the top and the bottom of the Thin Cuts to poke the letters out.  If your painter's tape is wide, cut it down.  I didn't want them to separate and have to build the word each time.  I've since learned that  if you have Cling Wrap plastic wrap - the one that's sticky on one side - that could be used instead of the painter's tape.  It's probably better too, since you can see through it.

Position the "WISH" onto the stamped paper securing it in place with the overlapping tape.  Run through the machine and poke out your letters.  NOTE: if you are making more than one of these cards, make sure your word stays with it's matching background!

Once the letters are cut, they're ready to have 3D foam tape (Z1151) added to the back.  I used the regular height for this (and the balloon).  The stamped part was adhered to the Pacifica cardstock which, in turn, was adhered to a card base.  Then "A BIRTHDAY" was stamped so it could be lined up with the edge of the "W" in Pacifica (Z2892) ink.  The letters were put back in their respective hole.  The balloon received the thin 3D foam dots (Z3341)on the balloon, but the end of the balloon was adhered to the card using Bonding Memory Glue (Z553).  The final step was adding the Central Park Sequins (Z4178).

Done!  My take of the Eclipse card.  : )

Wednesday, June 27, 2018

July 2018 Workshop - Birthday Cards Utilizing Birthday Cheer PML Cards

July's workshop is here! You can never have enough birthday cards.  This crop is going to work for all types of birthdays.  Again we'll be utilizing our Picture My Life cards for greeting cards instead of scrapbooking.  And we'll only have to stamp three sayings.
Workshop dates are Thursday July 19th and Monday July 23rd from 7 to 9 pm.  Cost is $20 which will get you everything to make the 10 cards pictured above with envelopes.  Please RSVP to me by Sunday July 1st.

Sunday, June 24, 2018

Sweet 16 Thank You Cards

Lindsey, and I hope the girls, had a great time at the party!  And every good hostess sends thank you cards.

Keeping with Chelsea Garden's paper, here is the thank you card.  I was inspired by the "A Million thank-yous" card found in the Annual Inspirations idea book on page 37.

I changed out the saying (I don't have the one pictured) to one that's been retired for I don't know how many years.  Lindsey sprayed the upper part of the card with diluted Crystal Blue using our Spray Pen (Z1380).  Unfortunately, I think I diluted Crystal Blue too much because you can't see the color it adds that much (especially in the picture - it's the darker area in the upper part of the card).  I also think she was spraying the cards really close so the drip part was lost.

Still, I like how it turned out!

The longer banner is 5" x 1.5".  The shorter banner is 4.5" x 1".  The Whisper Thick Twine is 5" long with a knot in it.  Liquid Glass was used to adhere it to the card.  The extra was trimmed.

Lindsey took several hours writing her thank yous.  It's really sweet to think about what she wrote to each girl.  I'm one lucky parent!!

Wednesday, June 13, 2018

Sweet 16 Birthday Card

What have I been up to? One thing is that my (now) 16 year old asked me to make her birthday party invitations!  No hinting/asking/pleading on my part.  In fact, I think last year we just sent out an evite!  Of course I couldn't say "no".  : )

Even though the paper is gone, I love the feel and colors of Chelsea Gardens, so that's the paper I chose for the invites.  Lindsey wanted some bling, so I pulled out my stash of Sea Glass Glitter Paper and my Cricut Collections.
The pattern came from Make it from Your Heart Vol. 4; pattern #15.  The Heather behind the "Sweet" is actually the zip strip from one of the Chelsea Garden's B&T paper.  I cut it in half and adhered it to the back of the White Daisy paper.  The circle is also Heather cardstock.  The other colored cardstock is Sweet Leaf ("Sweet"), Juniper (between the B&T papers), and Crystal Blue.

This card went together really fast conceptually.  And assembling the 21 cards went quickly too.  Lindsey adhered the two "Sweet"s together, added the "16" to the circles, and added thin foam to the backside of the Heather circles.

Monday, June 11, 2018

A Bushel & a Peck SOTM for June 2018

I'm actually posting!  I haven't been idle crafting, but posting has been a back seat to life...


Here is the stamp set of the Month "A Bushel & a Peck".  Super cute gal.  I can see her colored in winter colors and showing up on a Winter layout.  Or in the fall with the blowing leaves.

With the "I love you a bushel and a peck", this card could be used for an anniversary or Valentine's day.

This stamp set is only available in June 2018, but it's uses far outlast the month.


This is an example made by Close to my Heart using the girl.  They used markers to color the girl, sign, apple, and leaves.

Change the saying to "you're the apple of my eye" and you can give it to your daughter for a thinking of you card or birthday.


I made this card.  The saying could easily be changed to one of the other ones and this card can be given to your son (or daughter).  It is also an example of a thank you card.

I used Splash of Color (D1733) stamp set to create the blotches of color with second generation Peacock (Z2849) ink.  Under the basket there is a Toffee (Z2828) scribble from the same stamp set.

The pattern is from Make it From Your Heart Vol. 4 (9044).  It's pattern #4 that's been rotated 90 degrees and then the banners were flipped.

Nutmeg (X5951) cardstock was sanded and bannered.  The dotted B&T paper the saying is stamped on is from Fresh Air (Z7232B) paper packet.  The bottom striped B&T paper is from the Enchanted Fundamental (Z3352) paper packet.  Glacier (X5979) and White Daisy (1385) cardstock were cut out using the Thin Cuts - Basic Circles (Z3318).  The bushel of apples were stamped using Archival Black (Z3271) Ink on scrap White Daisy, colored with pencils (3505), blended with water using our waterbrush (Z3225), cut out, and (finally) mounted using Thin 3D Foam (Z2060 or Z3341 - thin dots).  Lastly, the Bronze Sequins (Z4029) were added.

What will you create?  Order yours before June 30, 2018!

Monday, April 16, 2018

Cards from Picture My Life

You can make cards from scrapbooking supplies.  This is my April workshop, inspired by my friend Candace, using the Picture my Life -- Be-YOU-tiful (Z4149).  In the workshop, we'll be making 10 cards.  I have a couple of extra Picture my Life cards left over to make one or two more cards.

I like this PML set and how easily the cards combined for the greeting cards.  The PML cards just needed some cutting (and not all of them).  I added a little Tangerine cardstock (X5972), Gimme Some Sugar Paper Packet (X7228B), Blossom cardstock (X5973), and Peacock cardstock (X5958) to the mix.   I used two stamp sets although I could have gotten away with one.  The main stamp set is C1709 - Chelsea Gardens - Cardmaking.  It has the butterflies and most of the sayings.  The second stamp is M1187 Thinking of You.


Other accessories include Bashful Pearls - Z3369
White Twine - Z3216
Thin 3D foam - Z2060 or Z3341
Peacock Stitched Ribbon (also out of here at the end of the month) - Z4144
Whisper Thick Twine - Z3095
Rose embossing Folder - Z3343 and colored pencils (ours are being updated and aren't available for purchase at the moment)


There are several flowers that were cut out (thanks again, Candace, for the inspiration!).  In fact, the butterflies and some of the sayings are the only things stamped on these cards.


Here are six of the ten cards closer.

The bummer part is that the stamp set and the PML card set - Be-YOU-tiful (and the peacock stitched ribbon) are only available through the end of the month (Seasonal Expressions 1 is retiring)!  The good news is that there is still time to shop and purchase the materials you need to make these cards!

Wednesday, April 11, 2018

Birthday Cake

What do you think?  It turned out as I was hoping it would.

Let me turn back the time a little, though.

Two days before my daughter's 14th birthday, she decided to ask me to make a vanilla, lemon, or white cake for her.  Mind you, when I had asked her about a week prior, she told me I could surprise her.  I had planned on making some peanut butter brownies with strawberries and whipped cream.

Other than the flavor of the cake, I could decorate it anyway I wanted.  For me, that's too much freedom, and choices.

Many years ago, I bought a cupcake doctor book.  The author adds ingredients to the box cake mix to make it yummy.  I pulled that book out to see what I'd be adding to my white cake box mix.

On the Kid's Baking Show on Food Network, one of the kids added sprinkles to the cake batter to make it festive.  I remembered that and thought it a great idea.  I added an eye-balled amount of sprinkles.  : )

Cake baked.  How do I decorate it?!  I have no idea!  Okay, okay, breathe.  How about with some cookie crumbs along the outside?  That should be nice.

This is how it turned out:
I put the candles above the "happy".  She liked the decorations.  We all liked the taste of the cake.  : )

Wednesday, March 28, 2018

Thin Cut Gift Boxes - On sale through 3/31/18

I'm so glad I decided to buy these Thin Cuts!  Look how cute these boxes turned out.  : )  I have two different ones because as I was working on the floral one, I thought about using cardstock and just stamping on it... I'm getting ahead of myself... Let me start my story.


This is the first one I started with.  I cut the paper 5.25" x 7" to not waste paper for the die.  Therefore I could make two boxes from one 12" x 12" paper, and have plenty of paper leftover.


I've wanted to use this stamp set for awhile.  My upline, Kay Pekin, sent me a card that I fell in love with that used this flower.  Before you ask, no, there is no thin cut for the flower or leaves.  I had to go the old fashion route and cut them out by hand.


I created my second box after thinking about stamping on cardstock (as I stated above).  However, when I started thinking about the stamp I would stamp my Juniper cardstock (X5979), I had an inspirational thought of running the box through the Rose Embossing Folder (Z3343).  And then I decided to sand the embossed image.  Ooh laa laa.


Everything other than the box is the same.

The flower and leaves come from the Chelea Gardens - Scrapbooking (D1760) stamp set.  The flower was inked in Glacier (Z2841), rolled in Crystal Blue (Z2817) and then stamped on scratch White Daisy.  The center of the flower was inked and stamped with Heather (Z2826).  The leaves were inked in Sweet Leaf (Z2853) and rolled in Fern (Z2850).  The saying was stamped on the Chelea Gardens Paper Packet (X7230B).  Don't recognize the stamp?!  It's a petite perk stamp (one of four small sayings) that isn't available for purchase.  Your consultant needs to give it to you, and it changes each quarter.  How do you get one from me?  If you order the Thin Cuts and Stamp Set from this project on my website before April 30th (although two of the Thin Cuts are on sale through March 31, 2018), I'll give the petite perks to you free!  Other ways to earn the the stamp set is to host a gathering and have someone book a gathering from yours.  Here is the stamp set: 
image slightly larger than actual

Back to my story...
The wider banners are from the Basic Banners Thin Cut (Z3345).  I used the 1.5" banner.  After I stamped the saying with Black ink (Z2805), I cut 0.25" from the flat part of the banner to make it shorter than the Heather cardstock (X5947) banner.  Remember that our cardstock is two toned now!  The narrow banner is the backside of the Heather cardstock, and is 5/8" wide by 1 5/8" long.  I would have used the 1" thin cut banner, but the banner needed to be longer than the 1.5" banners (and you can't add length to the banners).  I did use the 1" thin cut banner as a guide as to how high to cut to form the banner.  I finished the boxes off with Grey Enamel Gems (Z3089) - yes, the gems are white - they come in three different shades.  : )

The differences between the boxes (besides the base paper) are what I raised with Thin 3D Foam (Z2060).  I raised the banner on first box shown.  I raised the flower on the second box.  I couldn't decide which way I liked better.

Tuesday, March 20, 2018

Porcupine Fun

Today's sample is for this month's Cardaholic swap.  How I picked what to do was done with the creative blocks I made last year.  Stacy, our ring leader, rolled the dice that landed with:

reds/yellows
animal
ribbon/twine, and
coloring

This is my creation:
The hedgehog is from an old retired stamp set - Happy Forever (D1423).  He was colored in with our watercolor pencils (3505) after being stamped with Nutmeg Ink (Z2830).  The butterfly was stamped a second time, on  White Daisy scratch paper, with Black Memento Ink (Z899).  After coloring and cutting the butterfly out, I mounted it to the nose of the porcupine with both Bonding Memory Glue (Z553) and Thin 3D Foam Tape (Z2060).  The wings were raised, but the legs were glued directly to the butterfly image below it.

Mr. Hedge was glued directly to the White Daisy mat.  That mat was sponged with Toffee Ink (Z2828) and Sponge Daubers (Z726 or Z1938).  The mat is raised with the Thin 3D foam above the Pomegranate and Lemon paper.

Since we don't have spotted Pomegranate Cardstock (X5964), I stamped the dots using Line it Up stamp set (D1709 - from Flower Market Collection) and Pomegranate Ink (Z2854).  The Lemon paper came from the Adventure Fundamentals paper packet (Z3351).   The grid is unified by being on top of Toffee Cardstock (X5950).

I used retired ribbon (some dating wayyy back).  "Sending Smiles" is from Sending Smiles - D1708 (also from the Flower Market Collection), stamped in Nutmeg Ink.

Once the card was put together, I went back with my Clear Shimmer Brush (Z3293), and added some sparkle to the butterfly (you can't see it in this picture).

This card makes me very happy.  I hope the recipients enjoy it as much as I do.

Friday, March 16, 2018

Die-Namite Sale through March 31, 2018

When die cuts first came out, they were mostly shapes.  I passed.

When our Thin Cuts came out, I thought, "Well, that's nice, but I can cut the images out," and I passed.

When more Thin Cuts came out, corresponding to more intricate stamps, I thought, "I should try this and see." Especially when words came out such as "happy birthday", "celebrate", and "happy".

Since trying them, I LOVE them!  I didn't think it was a big deal to cut out images, but with the Thin Cuts, I can cut blanks out and stamp them later, with no cutting!  Wham Bam, thank you, Ma'am.

So, this is the month to fall in love with Thin Cuts.  Lots of them are on sale right now.  Even some current ones!

Here is the link for the current month's specials on my website.  Go check it out.  Buy something you can die for!

Tuesday, March 13, 2018

Mini Brag Book Updated Again!

Besides this being an easy project to create, it's easy to recreate!  If you'd like to learn how it's made, check out the Bashful/Pewter book I made last year.

This book was made using some product from our Seasonal Expressions 1 idea book.  The stamp set is Chelsea Gardens - Cardmaking (C1709),  Gimme Some Sugar Paper Packet (Z7228A), Peacock-stitched Ribbon (Z4144), White Daisy cardstock (1385), Peacock Cardstock (X5958), Pewter cardstock (X5954), Peacock Ink (Z2849), Black Ink (Z2805), Watercolor Pencils (3505), Hook and Loop Dots (Z1805), and the Clear Shimmer Brush (Z3293).


Oh yeah, I also used some hidden gems - like "Celebrate" (M1188) and Pen Pal Alphabet (B1539) for the saying.  I wanted a general saying, but you could easily substitute any of your own (including any of the 5 included on the stamp set).


With this book, I elected to stamp directly onto the Peacock cardstock.  When closed, the butterfly covers some of the front.  It's just fun!


And on this inside, I used B&T paper as my background paper.  The first page is light enough for me to add my journaling directly to the paper.  If you look carefully, you'll see my knife cuts from the craft knife around the flowers and butterfly.  I did mask the center flower before I stamped the outside two in my cluster.

The Front butterfly... that was colored with the watercolor pencils and then blended with the Shimmer brush.  The colors are mixed a little and there's a little shine to the butterfly!  I did hand-cut the butterfly (the thin cuts are sold out)

Thursday, February 15, 2018

Sunny Thoughts Envelope Bag

A fellow consultant challenged me the other day to make something from a box of Kraft colored envelopes.  While we were talking about potential projects, she teasingly asked if I remembered making bags out of envelopes.  She gave me a box of the envelopes, "downsizing" she said.  ;)

I do remember the days we created a bag from an envelope and set out to do just that again.


Let me walk you through how I created mine:

Seal the envelope. That's simple enough.  The flap will allow the bag to be closed rather than drafty.

Cut the envelope - usually in half, to create an opening for the bag.  These envelopes are 11" long by 4.75" wide, and I didn't want my bag that tall.  I cut the envelope in half anyway.  Then I cut an additional 0.25" (from the cut side), twice, for my handles.  And then I just cut off some more so that a gift card would just sit inside the bag.  Therefore, before scoring, I cut the envelope to 4.25".

Score the bottom and the sides.  The first one I scored at 0.75" on the bottom and 0.75" along each side.  I decided it was too wide for me, so I scored this one at 0.5" on the bottom and 0.75" along each side.
Fold on the score lines, really well, folding in the both directions.  Your bone folder really helps here.

Create the bottom.  Now that you've folded the score line really well, open up the envelope.  You will have the natural envelope edge in the middle of your two scored lines.  And as you square the bottom off, you'll notice you have a triangular section forming below the bag.  That's good!  Those triangular sections will get folded and glued to the bottom of the bag.  Use a bone folder to get into the corners of the bag.
You'll also notice the sides of the bag forming too.  Those are created from the scored lines along the side.  Go ahead and define the sides more too.

Decorate!  I thought the color of the Kraft matched our Gimme Some Sugar paper (X7228B) really well, so I went with that.  : )
The "You are the Sunshine in my pocket" stamp is one stamp, so I stamped it once on a 2.5" circle (thin cut Basic Circles - Z3318) in Peacock ink (Z2849), cleaned it, and stamped it again on scratch White Daisy using Tangerine ink (Z2809).  I used a paper trimmer to cut just below and above the dotted lines (highlighting "SUNSHINE"), bannered the edges, inked the edges with Tangerine, and mounted it with Thin 3D Foam (Z2060).  I also inked the edge of my circle with Peacock ink.
For the single flower (that's a single stamp too),  I stamped it once in Tangerine ink, and created a second generation with Juniper ink (Z2865).  Have I ever mentioned that I'm anal?!  I cut around the Tangerine flower, and when I cut the Juniper image, I cut off the ends of the flower.  Most of the Juniper flower is still there, for placement and anchor, of the Tangerine flower that I glued directly onto the Juniper flower.
For the handles, I cut them shorter, removing the envelope flap.  I used the bone folder to create the curve of the handles.  That's achieved the same way you curl curling ribbon with scissors.  The bone folder doesn't damage the paper though.  : o  Bonding memories was applied to the ends of the ribbon to adhere them to the bag.

Fill it!  Put a small surprise in your bag, and watch the recipients face light up when they receive the bag!  : )

Sunny Thoughts (S1802) has additional good stamp images.  It's only available through the end of the month.  Don't wait, we're halfway through February already!!

Thursday, February 8, 2018

Mini Brag Book Updated

A few months ago I updated that cute brag book and I thought I'd show it to you.  : )

This is the book with the cover closed.  I used the Basic Fundamentals (Z3353), Bashful Cardstock, Pewter Cardstock, and White Daisy.

The saying has been stamped with Bashful ink (color of the year!) using a stamp from the Artistry Cricut Collection (Z3190).  Don't forget three stamp sets and cardstock comes with your purchase of the larger Cricut Collections! The ribbon is from the Basics ribbon Pack (Z3364).

The album stays closed thanks to a loop and hook dot (Z1805) that's hidden under the knot of the ribbon. The saying is adhered to the ribbon so that when you pull up on the ribbon, the pictures can be revealed.
You can kind of see the hook and loop dots...

Finally, the inside of the album reveals space for 3 pictures and one area for journaling.
Just like the original, I cut along the butterfly's wings and the flowers using a craft knife so I can tuck a 2.5" x 2.5" picture under the images.  The flower page is where I'd journal, and the spotted page (stamped using a background stamp from the Flower Market Cricut Collection) will host another picture.  The images were colored using our Watercolor Pencils (3505)

Let's put this baby together, shall we!

The 3" x 12" Bashful cardstock is scored at 3", 6", and 9".  The inside White Daisy cardstock are 2.75" x 2.75", as is the front B&T paper.  The Pewter cardstock base is 3.25" x 3.50".  The extra 0.25" accommodates the loop and hook dot.

How I managed closure... I tied a knot in my 6" of ribbon.  Held the knot to the side of my folded Bashful paper, and added some adhesive to the underside of the ribbon that extended past the front.  Attach the ribbon to the back of the Bashful paper.  Attach the Bashful/Ribbon part to the Pewter base, shifting it to one side to make room for the loop and hook dot.  Orientation DOES matter!  I make three sides (top, bottom, and left) equal distant from the edge of the Pewter.  Have I over explained that part?!  Finally, I add a hook to the backside of the knot, attaching the loop part to the hook dot, and pushing the ribbon (with hook and loop attached) into place to the right of the book on the extended Pewter base.

Super quick to make, this mini brag book is a great gift!

Wednesday, February 7, 2018

February is Pretty in Pink

If the Butterfly Mobile isn't your thing, but the colors pink and gold are, Close to my Heart has you covered this month.

During the month of February, you can save 30% on select bundles, and 25% on select pink and gold items, embellishments, and stamp sets.

The featured colors are Bashful (color of the year), Pixie, Blossom, and Raspberry.  You can get any of those ink pads or cardstock for 25% off.

But wait, there's more...

The two stamp sets shown above are 25% off. 
Cut Above (buying this gives you a 30% discount on one My Legacy album) and Picture My Life Cards - The Story Begins (Baby Girl) are both 25% off.
Gold Heart Clips, Glitter Gems, Glitter Paper, and Foil Paper are all 25% off.

But that's not all...

Click here to check out all the items you can get at a discount, it'll be easier.


Thursday, February 1, 2018

Butterfly Mobile

Do you, or someone you know, have a young girl?  If so, maybe the Butterfly Mobile bundle is right for you.

Have a girl or boy who likes other colors?  Use the instructions to create any color butterflies flowers, creating your own mobile!

Heck, cut any shape you'd like out for other types of mobiles!  Oh, no, my brain is starting to cramp with all the possibilities!

Close to my Heart has made ordering this project a breeze by bundling it together - and at a discount.  All the supplies (except adhesive) to create this project is 30% off.  There's a bundle with the stamp set too.

Here's the video on how to assemble the mobile.  : )


Need more help putting it together?  I'm here to help.

I'm full of questions today, aren't I?!