Showing posts with label Scrapbooking. Show all posts

Tuesday, July 25, 2023

One Page Scrapbook Revisited

I really enjoy making one page scrapbooks.  This is such an easy project that I taught it this summer to middle school kids.  They were able to do the cutting and scoring while I talked them through it.  I did modify it slightly to reduce the amount of background and texture (B&T) paper sheets I'd need for the class.  If you compared it to the last time I made it, you might notice.  But I doubt it.  You'll probably notice that I used a lot less B&T paper this time around.  Why put it in if it'll be covered with pictures.


I used a loop and hook closure on this project.  I like the look much more than the ribbon.  The saying was cut from an oval thin cut with the stitched edge.  Yours can be any shape you'd like.  This is super simple due to time.  The strap should stay somewhat in the middle for balance of the front and keeping the book closed.


Three coordinating 12" x 12" sheets of cardstock and one 6" x 12" B&T paper went into the making of this scrapbook.  I used the zip strip from the B&T paper for the strap, but cardstock could also have been used.  Okay, scratch White Daisy too, for the title.  I don't really count that because I have so much of it, and it's such a small amount used in this project.

The first cardstock is the base of your project.  Cut 1" off one side so you have a 12" x 11" piece.  Then score along the 11" side at 3.5", 3.75", 7.25" and 7.5".
Rotate the paper and score along the 12" side at 4.5" and 9".
Cut along the 3.5", 3.75", 7.25", and 7.5" score lines to the 4.5" score line from above.  Then cut away the 0.25" tab.  Repeat from below to the 9" score lines.  Burnish the remaining score lines really well.
 
The other two 12" x 12" cardstock sheets will be cut the same way for each.  Here, they are the Black and Candy Apple. Cut at 11.75" along one side.  This piece will be the middle layer of your strap .  Put that aside (you'll only need 1 of these, the other is scrap).  With the paper still in your cutter, cut at 9.75".  What you cut off is scrap.  You should now have a 12" by 9.75" piece.
Along the 12" side, cut at 8.5", 4.25", and 3.25".  Now you have 2* 4.25" x 9.75" pieces, a 3.25" x 9.75" and 0.25" x 9.75" scrap.
Take the 2* 4.25" x 9.75" pieces and rotate them.  Cut along the 9.75" side at 6.5", and 3.25".  That should leave you with 6* 3.25" x 4.25" pieces of cardstock. 
Take the 3.25" x 9.75" piece, rotate it, and cut at 8.25", 5.5", and 2.75".  You should have 3* 2.75" x 3.25" pieces and 1.5" x 3.25" scrap.

Repeat with process with the second cardstock.

If you are using directional B&T paper, the 6" x 12" piece should be images "looking at you".  Now you'll cut that in half along the 12" side, yielding 2* 3" x 12".  Then rotate the papers.  Cut both 3" pieces at 8" and 4", leaving you with 6* 4" x 3" pieces. 
Take 1 of those pieces and cut 0.5" off along the 3" side so you're left with a 0.5" x 4" piece (scrap) and 2.5" x 4" piece.  Rotate the 4" piece and cut at 2", leaving you with 2* 2.5" x 2" pieces.  These are the smaller pieces that go on the bottom panels.

Once done cutting, you need:
1* scored and cut base (lemonade)
6* 3.25" x 4.25" cs #1 (candy apple)
6* 3.25" x 4.25" cs #2 (black)
3* 3.25" x 2.75" cs #1
3* 3.25" x 2.75" cs #2
5* 3" x 4" B&T paper
2* 2.5" x 2" B&T paper
1* 1" x 12" base for strap
1* 0.75" x 12" cs #1 or #2 for strap
1* 6" zip strip for strap

Closing the book.  The three small sections fold upward.  The three large sections fold downward.    The right panel folds inward (to the center), and finally, the left panel folds inward on top.  For me, that's the front cover.

Assemble as desired, remembering that our B&T paper is double sided.

Notes while assembling:
  • I put my smaller sections at the bottom of my book.  It doesn't have to be.
  • Be aware of directional paper.  Make sure it's lined up correctly.
  • Determine where your front is.  When the book is open, it's actually on the back side.
  • Don't glue on the back panel until after you've attached the strap.
  • Decorate the front cover so you know where to put the strap.
  • Finger score the strap from the left side of the front around the right side and onto the back.  Once you do that, cut off the excess (Again, I made my strap go the full width of the back).
  • I glued the strap the whole width of the back panel.  Since my zip strip is only 6" long, I lined it up with the front edge.  You wouldn't know it wasn't long enough because it's covered by the back panel.
  • Glue the back panel on after the strap is glued.
  • Hoop and Loop: To make sure the two halves line up, I adhere the hoop side to the strap.  Then I attach the loop side to the hoop and remove the adhesive cover from the loop backing.  Then I push the strap down in place.  Since the adhesive is exposed, the loop side should stick to the front cover.  And the hoop and loop sides line up.
  • Add pictures and journaling as desired.
Enjoy!!

Wednesday, May 17, 2023

Process Video of the Making of a 12" x 12" Layout

I want to share with you this video that Karen did, especially for those of you who scrapbook.  I think this video is important because Karen talks through her process.  She changes things as the video goes on.  I believe it can free many of you from the fear of scrapbooking.  I hope it does.  : )

And, I take part of my statement above back.  This process can happen to those who make cards too.  I often make more than one so that I can audition my different choices.  And many times I make them with the different choices (this is a great example).

The Life's a Hoot Digital Collection (X7290F) is still available as of the publish date.  But you can use any images... again, it's the process that's important.

Monday, November 5, 2018

One Page Scrapbook

My upline, Kay Pekin, sent me this scrapbook last year.  It was made from one 12" x 12" cardstock paper and several cut papers.
 I liked it so much, in fact, that I recreated it and had other consultants make samples of it.  I used what was updated paper, but it's easy enough for you to use any paper you have.

Updated version (but since retired):
As you can see, I didn't want to use ribbon - making 15 kits, it would be too much.  Instead, I used hook and loop to make a closure from the back.  If I were making this a specific themed book, I'd add the theme or person it was about under the flap.  Then it would be a sweet surprise upon opening!

Let me show you a little more of the meat...

This is opened up completely.  The bottom three sections could be used for journaling or some smaller pictures.  I went with two background and texture papers, but you can do more if you'd like.

You need a total of:
10 B&T papers each measuring 3.25" x 4.25"
10 cardstock each measuring 3.5" x 4.5"
6 cardstock each measuring 3.5" x 2"
1 white cardstock (for front) measuring 3.5" x 4.5"
Band cardstock measuring 1" x 5.5"
Band B&T paper measuring 0.75" x 5.5"


This is the view with the six flaps folded into the middle section.  The right side is folded into the middle, followed by the left side, and you see the front.


Let's score the 12" x 12" paper...
On one side, you'll score at 3 3/4", 4", 7 7/8", and 8 1/8".
Rotate the paper 90 degrees, and score at 2 3/8" and 7 1/4".

Fold on all score lines.  Cut out the small sections (as seen above).

Once you've adhered all the paper to the book - NOTE: don't adhere the last cardstock piece to the back yet!  This will cover the band end - you're ready to add the band.  Adhere the B&T piece to the cardstock.  Add the Hook and Loop Dots (Z1805) to the one end of the band and the front of the book.  Finger fold the band around the edge of the book.  Adhere the back of the band to the back of the book.  Then adhere the cardstock over the band giving the back a clean look.

Decorate the front of your book.  Here, I used the Stitched Oval (1.75" size) thin cut (Z4187), cut flowers, and sequins.

If you have gifts to give, this is an easy one to knock out several at a time.  They're appreciated too!

Tuesday, March 13, 2018

Mini Brag Book Updated Again!

Besides this being an easy project to create, it's easy to recreate!  If you'd like to learn how it's made, check out the Bashful/Pewter book I made last year.

This book was made using some product from our Seasonal Expressions 1 idea book.  The stamp set is Chelsea Gardens - Cardmaking (C1709),  Gimme Some Sugar Paper Packet (Z7228A), Peacock-stitched Ribbon (Z4144), White Daisy cardstock (1385), Peacock Cardstock (X5958), Pewter cardstock (X5954), Peacock Ink (Z2849), Black Ink (Z2805), Watercolor Pencils (3505), Hook and Loop Dots (Z1805), and the Clear Shimmer Brush (Z3293).


Oh yeah, I also used some hidden gems - like "Celebrate" (M1188) and Pen Pal Alphabet (B1539) for the saying.  I wanted a general saying, but you could easily substitute any of your own (including any of the 5 included on the stamp set).


With this book, I elected to stamp directly onto the Peacock cardstock.  When closed, the butterfly covers some of the front.  It's just fun!


And on this inside, I used B&T paper as my background paper.  The first page is light enough for me to add my journaling directly to the paper.  If you look carefully, you'll see my knife cuts from the craft knife around the flowers and butterfly.  I did mask the center flower before I stamped the outside two in my cluster.

The Front butterfly... that was colored with the watercolor pencils and then blended with the Shimmer brush.  The colors are mixed a little and there's a little shine to the butterfly!  I did hand-cut the butterfly (the thin cuts are sold out)

Thursday, February 8, 2018

Mini Brag Book Updated

A few months ago I updated that cute brag book and I thought I'd show it to you.  : )

This is the book with the cover closed.  I used the Basic Fundamentals (Z3353), Bashful Cardstock, Pewter Cardstock, and White Daisy.

The saying has been stamped with Bashful ink (color of the year!) using a stamp from the Artistry Cricut Collection (Z3190).  Don't forget three stamp sets and cardstock comes with your purchase of the larger Cricut Collections! The ribbon is from the Basics ribbon Pack (Z3364).

The album stays closed thanks to a loop and hook dot (Z1805) that's hidden under the knot of the ribbon. The saying is adhered to the ribbon so that when you pull up on the ribbon, the pictures can be revealed.
You can kind of see the hook and loop dots...

Finally, the inside of the album reveals space for 3 pictures and one area for journaling.
Just like the original, I cut along the butterfly's wings and the flowers using a craft knife so I can tuck a 2.5" x 2.5" picture under the images.  The flower page is where I'd journal, and the spotted page (stamped using a background stamp from the Flower Market Cricut Collection) will host another picture.  The images were colored using our Watercolor Pencils (3505)

Let's put this baby together, shall we!

The 3" x 12" Bashful cardstock is scored at 3", 6", and 9".  The inside White Daisy cardstock are 2.75" x 2.75", as is the front B&T paper.  The Pewter cardstock base is 3.25" x 3.50".  The extra 0.25" accommodates the loop and hook dot.

How I managed closure... I tied a knot in my 6" of ribbon.  Held the knot to the side of my folded Bashful paper, and added some adhesive to the underside of the ribbon that extended past the front.  Attach the ribbon to the back of the Bashful paper.  Attach the Bashful/Ribbon part to the Pewter base, shifting it to one side to make room for the loop and hook dot.  Orientation DOES matter!  I make three sides (top, bottom, and left) equal distant from the edge of the Pewter.  Have I over explained that part?!  Finally, I add a hook to the backside of the knot, attaching the loop part to the hook dot, and pushing the ribbon (with hook and loop attached) into place to the right of the book on the extended Pewter base.

Super quick to make, this mini brag book is a great gift!

Friday, October 13, 2017

Time Machine - Mini Bragging Scrapbook from 2003

I tried sharing this with you when I arrived at my mother's house for the quilt retreat.  Look at this little treasure!  I made this gem many years ago (probably 15).  As with first born children, there is more time to do things (sorry, Amber!).  I gave this to my mom and dad, capturing Lindsey in her first and second year of life - back when she was unconditionally adorable.


mini magnetic scrapbook

Just thought I'd share it with you!  Even though it's small, this is a scrapbook!  Not too bad an idea...

It closes with a magnet.  : )  Maybe we'll make some of these at our Holiday Workshop on December 3, 2017 (with updated paper).  hmmm....

Friday, August 4, 2017

Flower Market - Page 29 Key

Today's installment has Jill talking about how to layer, and what can be done with changing sizes.


Supplies used today include:
Item Number Description
D1706School Kids (globe card)
A1182Etched Alphabet
X7211BJeepers Creepers Paper - RETIRED - can use any grey background paper (layout, globe card)
Z3255Whimsy Fundamentals (flowers and title on layout)
X5789Sea Glass Cardstock (Retired) (layout container, hydrangea card, globe card)
1385White Daisy Cardstock (layout base)
1388Colonial White Cardstock (layout, hydrangea card)
X5637Sweet Leaf Cardstock (layout, hydrangea card, globe card)
Z2872Whisper Ink (hydrangea card)
Z891VersaMark Pad (globe card)
Z2068Ranger Super Fine White Embossing Powder (globe card)
Z555Craft Heater (globe card)
Z3269You & Me Complements (hearts on layout)
Z3287Whimsy Ribbon Pack (hydrangea card)
Z3285Flower Market Cricut Collection

Friday, July 28, 2017

Picture My Life Video

Monica takes you through some stand alone sets we used to sell.  Now, though, every paper packet comes with two sheets of cut apart images.  Just like the cards she shows, each side has the same imagery but in both orientations.


What is still purchasable (is that a word?!), are the overlays.  We have three to choose from (until July 31, 2017 or while supplies last).  We also have more generic stand alone cards.
  • White Frames (Z3283).  These you place over your pictures to border them or add is little sentiment with the picture.
  • Retiring: Picture my Life Overlays - White (Z3193)
  • Retiring: Picture my Life Overlays - Gold & Silver (Z3144)

Stand alone cards are as follows:
  • Tabbed Journaling Cards (Z3278) are fun for journaling - lines to write straight! - and slide them into the pocket protector (or add on a page directly).
  • Watercolor Cards - both white/clear (Z3221) and gold (Z3217) are waiting for you to add color with watercolor paints.

How about miniaturizing your book?! Additional retiring items (July 31, 2017) are mini memories - Instalife 4" x 4" books - Blue Jean (Z3282) and Blush (with dots on them- Z3270).  These have their own overlays - Gold (Z3279) and Black (Z3284). They get their own memory protectors (4" x 4" Z3116) and printed cards - Hello Gorgeous (Z3275) and Enjoy (Z3291).

Take inspiration from the video and move your scrapping along with the cut apart cards found in the Seasonal Expression books!

Wednesday, July 19, 2017

Sign In Guest Book Album

I saw Karen Pederson at convention last month.  I wanted to, and did, thank her and curse her for the video she put together about the sign in guest book.  I loved the idea as soon as I saw it.  I sent it to my niece, who also loved it!  Since I had made my niece her wedding invitations as her gift (100 invitations made!), I needed to find a sponsor to make the album.  My younger sister jumped at the chance!  Yeah, Lora!!


This is the front page.  It will hold a 5" x 7" picture.  My niece wanted Sea Glass.  I added the grays, browns, and blacks.  When I learned that her flowers were going to have coral in them, I turned to the Hello Lovely (retired) paper and fussy cut the flowers for each of the layouts.


This back page also holds a 5" x 7" picture.  The saying is from a retired stamp.  I thought it appropriate for the last page of a wedding.  The front and back photos are double matted.  A very small frame of Sea Glass is between the black and white.


The following are the two page layouts.  There is a lot of white space for people to write things.  Some of the papers were Rustic Home Fundamentals, Sea Glass cardstock and glitter paper, Some KindaWonderful B&T, Desert Sand cardstock, Whisper cardstock, Black cardstock, Live Beautifully B&T paper, Rustic Home Ribbon, and Washi tape.

Each page is double matted.  The base page is 12" x 12" of Black cardstock.  The next layer is 11 1/2" x 11 1/2" of Slate cardstock (the groom was going to wear a gray suit).  Then the 11" x 11" White Daisy cardstock.
pages 2 and 3

pages 4 and 5

pages 6 and 7

pages 8 and 9

pages 10 and 11

pages 12 and 13

pages 14 and 15


    Some techniques I used:
    • embossing (front and back cover)
    • embossing and then sanding (pages 3 and 4)
    • direct to paper inking (pages 2 and 3)

    The strips of paper I used varied from 1/4" (going with the central background strip) to 3 1/2" (central background strip).  The banners ranged from 1/2" (washi tape and ribbon as well as paper) to 2 1/2".  Most were 1 1/4" to 1 3/4" I believe.  Each was bannered about 1/2" upward.

    Since pictures were not going in beforehand (my niece wants to put wedding picture in), I varied the orientation.  I stamped "place photo here" so people wouldn't sign there.  The single Black mat was cut at 4" x 6" and the white area is 3 1/2" x 5 1/2".  The 4" x 6" pictures will need to be trimmed down.

    I raised the flowers with Thin 3D Foam so that pictures could be placed beneath them.

    So, THANK YOU, Karen Pederson (her original post on her blog), for sharing this with us!  I'm so grateful because I've started a new tradition in my neck of the woods.  And curse you, for sharing the idea with us, because now I'll be making more.  : )  Of course seeing the expression of the bride and groom, and hearing the oohs and aahs of guests, the effort was well worth it!

    Friday, June 2, 2017

    Wedding Guest Sign-in Keepsake Book

    My niece is getting married in July so this video is great timing.  I'm going to "tuck" this into my memory for my daughters' wedding.  I just love this idea!!


    There are so many great papers that will work for this.  And new ones are "always" coming out.  I would just have place holders for the pictures if actual wedding day pictures were going into the album.  Dating pictures would be a nice touch too...  the journey to the wedding day.

    And reading the comments, it doesn't have to be just for a wedding.  Bar/Bat Mitzvah, Sweet Sixteen Birthday, Over the Hill Birthday, Christening, and anything else where a large number of people gather and would like to give good cheer to.

    Sunday, April 23, 2017

    Cut Above Layout Kit - Little One

    I thought I'd show you a little more about assembling the Little One kit.  I went ahead and punched out all of the die cut pieces and started laying out the layout (say that five times fast).


    Here is the left page laid out.  The instructions call for assembling the bottom layer. Unfortunately some of the shapes are covered by the picture.  But not here!

    You'll note that all the heart pieces are in the same orientation.  In the picture, the bottom right heart piece is only a small sliver (and the piece above that is covered completely.  I thought it cool that the far right pieces are only partial so it makes lining up at the edge of the paper easier, and there is no cutting involved.


    The same holds true with the right page of the layout; no cutting necessary.  The rest of the circle is cut down to only be the pieces you see to the right.

    Here's my tip about gluing these down.  In the picture, it shows the left side should be 1.5" from the top, but the picture is vague about which part of the circle should be 1.5".  So, I started gluing down the right layout first and went with the upper tip of the top piece as my measurement.  Since each piece touches, it's easy to place the other two pieces.


    Once I was done with the right page, I lined up the left page, and the upper right pie piece (of the left page) with the part circle of the completed page.  Wow that seems complicated!  I hope it's clear rather than clear as mud!


    Hopefully this picture makes it make more sense.

    You can also see that I didn't have my tips (left page) match exactly.  I figured a picture will be going over it, and I want this layout to remain quick.


    The above steps were the "hard" ones.  I then used the measurements given, and the picture for visual clues, for the next layers.


    Here is the completed left page.


    And the completed right page.

    The pocket cards go in as "instructed" or however you'd like.  I didn't bother to show you those, but you'll see them in the kit.

    Fast and easy.  Get yours today at dsdoodles.closetomyheart.com.  : )

    Friday, April 21, 2017

    Cut Above Layout Kits

    I haven't been on for awhile so you probably aren't aware of our special this month.  You can purchase our two current Cut Above Layout Kits for 50% off until the end of April (or until supplies last).  If you don't have a lot of time, or are new to scrapbooking, these two kits are for you!

    The first one is called Little One and is intended for young children.  My thinking, though, is to not put the two bears on the layout, and then the layout is for a child of any age.  They will always be your "little one"!  The colors are Sea Glass and Whisper - gender neutral colors and a beautiful blend.

    The second Cut Above layout kit is Forever and Always.  Corporate uses wedding pictures, but it can be used for an anniversary or, again, your children.  "Forever and Always" can refer to a project your passionate about, or a destination you are in love with.  Or just substitute the title with your own.

    In addition to the TWO printed base pages, you get 12 pocket cards, die-cut paper pieces, title and embellishment stickers, two Memory Protectors, and two pocket Memory Protectors.
    Tips are given for the assembly of the two page layout, which includes measurements for placing elements on the pages.

    I personally like the idea of the pocket pages.  You can get many more pictures without the stress of making more layouts.  And that's a good thing!

    Again, if you are new to scrapbooking - or want quick and simple layouts - these two kits are a great start.  And these are the first two in a succession of kits to come.  There are two more kits in the Seasonal Expressions 2 book (birthday and adventure) AND a five layout kit just for May and the National Scrapbooking Month!

    I've got a gathering open on my website labeled "A Cut Above - quick and easy scrapping".  Go now and get your kits before they are sold out!  Join the gathering in the lower right hand of the page, and then click on Monthly Specials to see both layout kits. 

    Friday, January 27, 2017

    Flower Market - Page 6 Key

    I thought this year I'd share a video each Monday, but then I thought... "Maybe Friday would be better so that you could pull it up and work on it over the weekend."  So, hopefully you'll like this feature.  I might even try making a video or two for you this year.

    Today's Flower Market video is for the key found on page 6 (and happens to be on page 6).


    Here are the supplies used within this video:

    C1631  Birthday Princess (layout - saying)
    Z3255  Whimsy Fundamentals (layout - base)
    Z3253  Adventure Fundamentals (layout - photo mat)
    1385    White Daisy Cardstock (bucket with flowers, typewriter)
    X5929  Whisper Cardstock (bucket, bucket with flowers, typewriter)
    X5789  Sea Glass Cardstock - Color of the Year - available through July 2017 (flower card, bucket with flowers)
    X5772  Canary Cardstock (flower 1, card, layout)
    X5769  Thistle Cardstock (flower 1, layout)
    X5782  Pansy Cardstock (flower 1, layout)
    X5778  Saffron Cardstock (bucket)
    X5777  Fern Cardstock (flower 1, layout)
    X5788  Raspberry Cardstock (typewriter)
    Z2873  Slate Ink (layout)
    Z2840  Thistle Ink (layout)
    Z3216  White Twine (flower card)
    Z1263  Bitty Sparkles (flower card, layout)
    Z553    Bonding Memories Glue Pen - 10ml
    Z3285  Flower Market Cricut Collection

    Monday, January 23, 2017

    Flower Market - Page 15 Key

    I thought you might like this video of a couple of projects using the key found on page 15.


    I particularly like the flower in the vase.  I'll have to try that!

    So you don't have to scramble to write down what was used, here they are:

    Z3255  Whimsy Fundamentals (layout)
    X5642  Cocoa Cardstock (layout and card)
    1385    White Daisy Cardstock (layout and card)
    X5771  Flaxen Cardstock (card)
    X5777  Fern Cardstock (card)
    X5774  Eggplant Cardstock (card)
    X5643  Chocolate Cardstock (layout)
    X5770  Glacier Cardstock (card)
    Z1375  Kraft Cardstock (layout and card)
    Z3265  School K-6 Complements (layout)
    Z3266  School 7-12 Complements (layout)
    Z3089  Grey Enamel Gems (layout)
    Z3292  Rustic Home Ribbon Pack (layout and card)
    Z3132  Watercolor Paint (background of card)
    Z3188  Paintbrush Set (background of card)
    Z3285  Flower Market Cricut Collection (layout and card)

    Happy creating!

    Wednesday, April 20, 2016

    Studio J Year in Review Layout

    Even though Studio J is retiring at the end of the month, I plan on continuing making a year in review layout.  As an example of last year, this layout highlights what happened.
    It's probably hard to read, but I highlighted the activities in the journaling on the far right.  Simple, and yet it will be nice to go back and look at the 2015 a few years from now.

    And that's how simple your scrapbooking can be.  This is a snapshot of a year in the life of the Simone Kurtz household - and doesn't include EVERYTHING.  And that's okay!  It doesn't have to be everyday.

    Tuesday, March 29, 2016

    Fabulous Fifteen In Progress

    Here is the basic layout from Cherish's Fabulous Fifteen two-page layout.  I still want to distress the Pixie paper and add embellishments still.

    This is Lindsey's birthday party from a few years ago.  It was an itty bitty party.  Bitty cakes (made from cookies).  The girls' hats are snow cone holders.  They made mini bouquets of flowers from pretzels and gummies.  I'll show you more details when I'm finished with the layout.

    I could call it finished (after journaling and a title).  This came together pretty easily thanks to the How-to books.  In the front of the book, there is a quick reference guide that notes how many pictures you can use on the layout.  Flip to the page, cut papers and photos... done to where I am now!  It's all about the tools, scrappers!

    Saturday, March 28, 2015

    Softball Mini Album

    My daughter's softball teammate had a birthday party last year.  Her teammate loves playing softball!  I thought it would be nice to commemorate the season for her birthday present.  All the work was done in the Cricut Craft Room using the Artbooking cartridge.

    the front cover

    The title was formed by welding the letters of Softball with the arrow.  I cut two copies out, one on white and one on black.  The year was created the same way.  A square was welded into the middle of the page so it would be cut out.  Then the sun ray and heart was glued underneath with vellum on top.
    Here is page one and two.  Page two features two small tags.  I left the sticky on the bottom to encourage the recipient to write. The tags were stamped in Ponderosa Pine on white cardstock.
    More teammates and a decorated car.  The gray areas may look a little weird -- I eliminated the girls' name.  The Grey Flannel page (you would use Whisper now) was distressed with the direct to paper technique.  I opened the stamp pad and lightly rubbed it against the paper in a circular motion.
    It was neat capturing some of the season's tradition along with the girls.  The girls became good friends.  : )  "All Star" comes as is.  I did cut a star out of the black paper so a window was created.  I can't remember why exactly now.  Maybe because I thought it would be cool and I could!
    The softball page was created by welding baseballs together.  The collage becomes softballs when it's printed on Honey paper.  After I created this page, I clicked on the image - hide contour - and eliminated the seams and space between the balls.  That's what formed the front and back covers!

    We finally reach the end of the album.  When I added the names, I put the girls' first and last name.  That way, years down the road, the birthday girl will have the names to look the other girls up.

    I know I had a lot of fun creating the book.  I hope she enjoyed receiving it!

    Friday, October 17, 2014

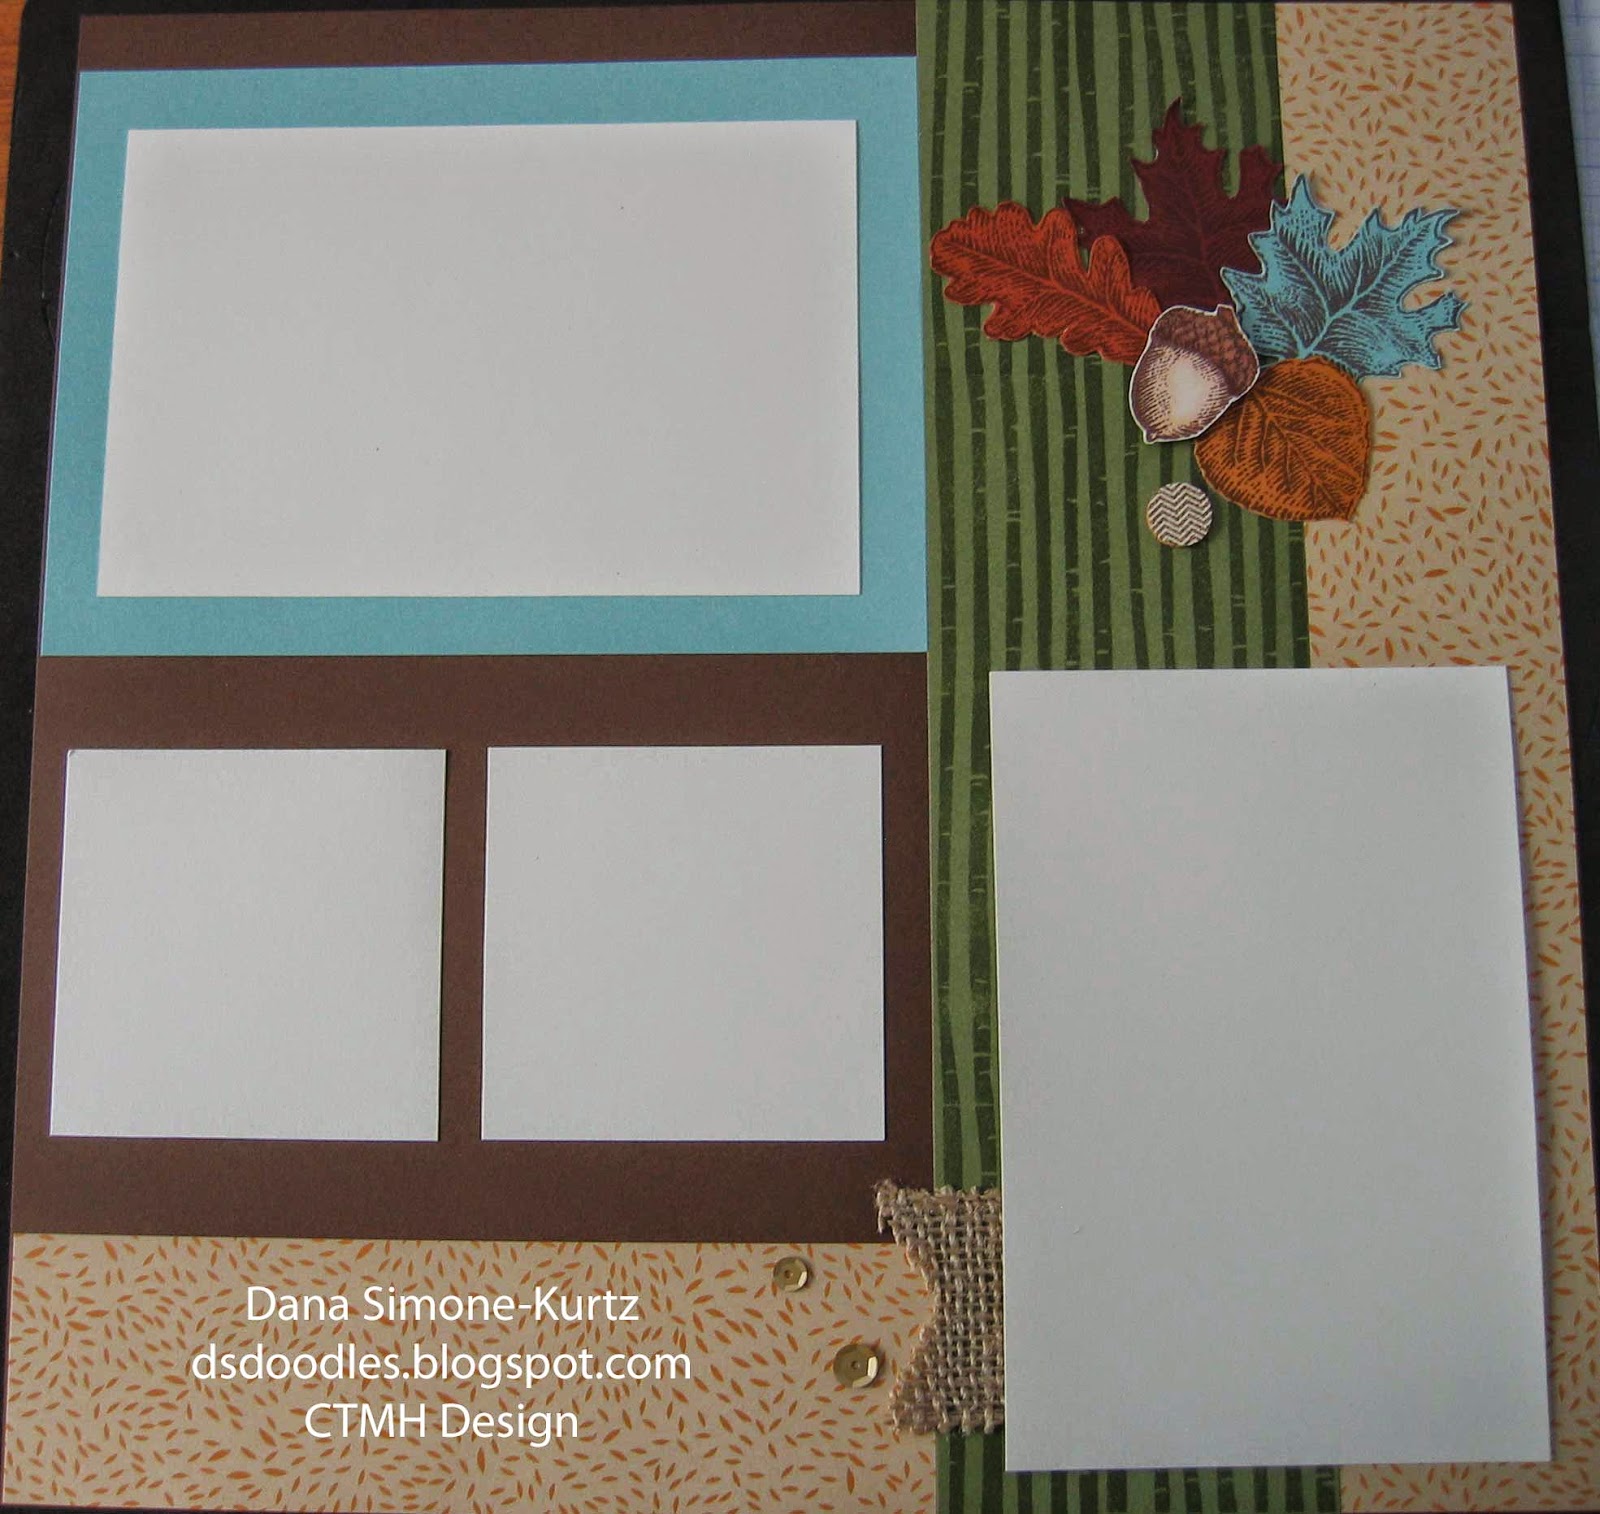
    October 2014 Shadow Box Club Layout

    This month I was inspired by fall colors, Pathfinding paper packet in particular, and the Pathingfinding Workshop on the Go Cardmaking kit.

    This layout is from the Imagine book. It is pattern “Monologue” which can be found on page 52-53.


    I stamped the Olive cardstock using the bamboo stamp from Season of Thanks (D1604) with Olive ink. I stamped all of the leaves in Chocolate ink on Goldrush, Barn Red, Autumn Terracotta, and Glacier cardstock.


    After adhering my base papers, I added some dimension with the burlap, acorns, title, and accessories.
    Final of Left page of Monologue


    Cutting out the leaves and acorns will allow layering.  The sequin and printed cork also add to the effect.

    The title was influenced by the Pathfinding card kit with the same saying.  I thought it appropriate for the time of year without shouting out "Thanksgiving".

    The burlap (discontinued) adds to the fall feel of the page.


    The white represents the 4" x 6" picture that would be placed there.


    Final of Right page of Monologue
    If you wanted to flip the papers over, they look good together as well.  I would recommend using lighter paper as the base though.  In fact, this kit almost came out with Champagne as the base.  I felt the leaves stand out more on this background, thus my completed project as shown. : )

    Additional modifications you may consider... edge distress all of the paper with the edge distressor. That will add to the fall feel of the layout. You could sand under the title too.


    The two large white papers represent 4" x 6" pictures, and the two small white papers are for the 3" x 3" pictures.


    Some close ups.


    Products used:
    X7186B Pathfinding paper packet
    X5770    Glacier Cardstock
    X5637    Barn Red Cardstock
    1243       Goldrush Cardstock
    Z3012    Pathfinding Assortment
    Z2012    Gold Assortment Sequins
    D1604    Season of Thanks stamp set
    C1504    Fall Harvest stamp set
    Z2111    Chocolate Ink Pad
    Z2137    Olive Ink Pad
    Z2460    Pastel Pink ShinHan™ Touch Twin™ Marker (acorn base)
    Z2445    Barely Beige ShinHan™ Touch Twin™ Marker (acorn base shading)
    Z2456    Mahogany ShinHan™ Touch Twin™ Marker (acorn top)
    Z2451    Clay ShinHan™ Touch Twin™ Marker (acorn top lines)
    Z679       Liquid Glass
    Z1836    Non-stick Micro-tip Scissors
    Z1151    3-D Foam Tape
    Burlap Ribbon (retired) – check the while supplies last supplies